Setting up Windows Store Python with Pandas in VSCode
01 Oct 2020
My beloved Spyder IDE suddenly stopped working on me, and I needed to install Python + Pandas on a new computer anyway, so I decided to explore installing Python (and various packages I use with it such as Pandas) out of the Windows Store, executing code in VSCode as an IDE.
The Windows installation of Python is pretty stripped down, like that of Miniconda, and similarly doesn’t require admin rights to one’s computer.
Therefore, I’ll cover hand-installing a few simple packages as in my older tutorial.
Note: This tutorial is aimed at non-programmers who just want to edit a few CSV files with Python. If you’re a serious data scientist, learn the nuts and bolts of Anaconda at Real Python’s “Setting Up Python for Machine Learning on Windows”
Did you get Python up and running?
Yay! I’m thrilled I could help.
If you’d like, I’d love a Ko-Fi. (Chai for me!) 🥰

Installing Windows-Store Python & running a Python program
Install Python from the Windows store
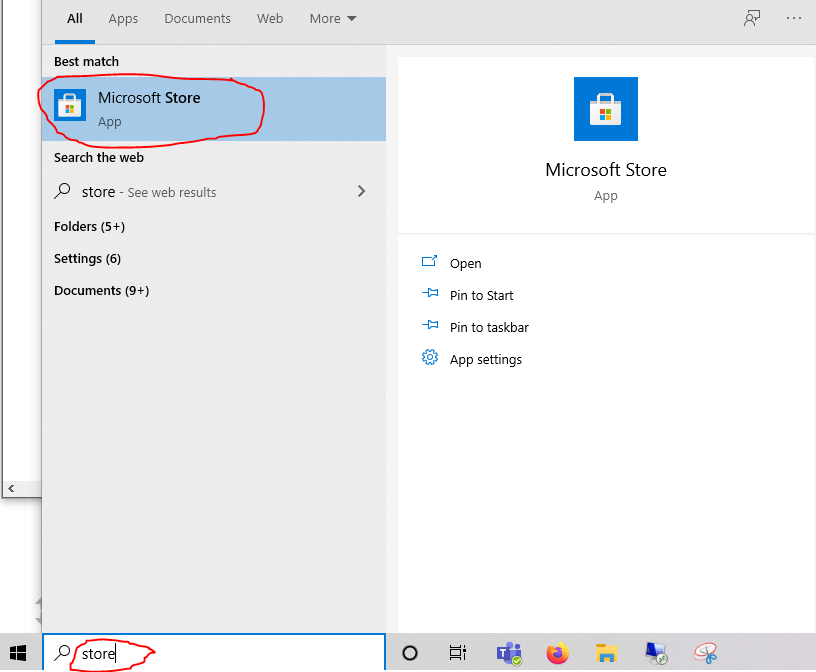
Click the Windows icon in the bottom-left corner of your screen, and then without clicking anything else, type the word “store.”
The Windows start menu should filter your list of available programs to suggest the Microsoft Store app. Click it.
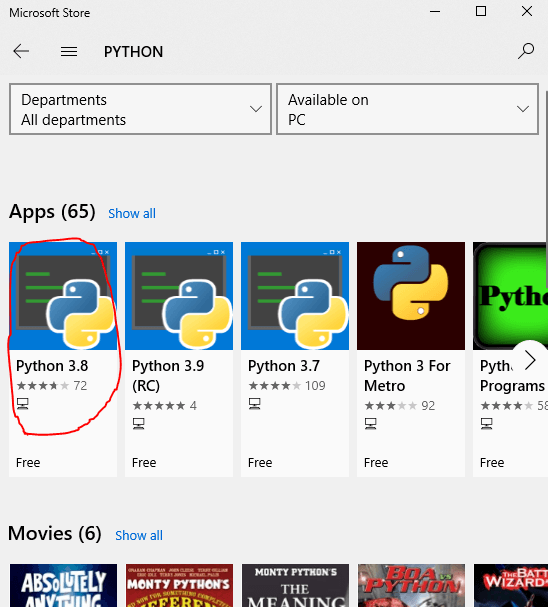
In the upper right corner of the store window, click the text entry panel next to a magnifying glass and type the word “python” and press enter.
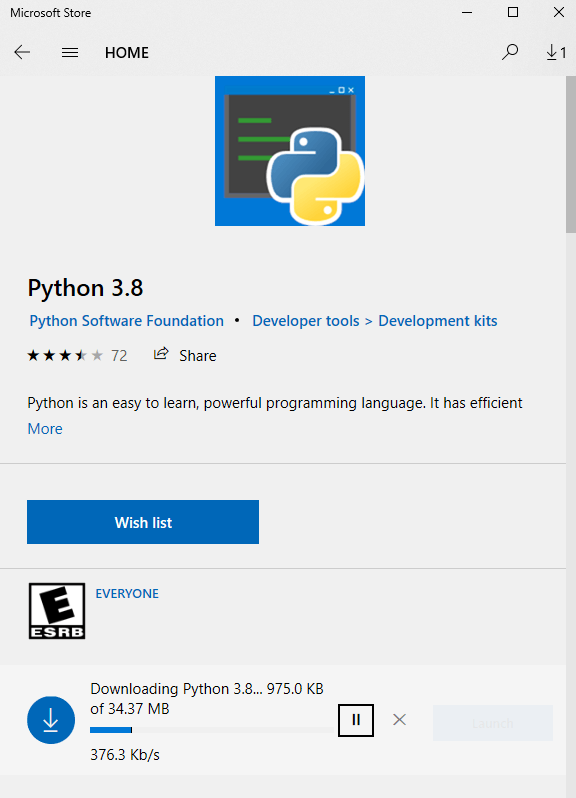
Available software to download should filter itself. Click the piece of Software named “Python #.#” but not “Python #.# (RC)” where “#.#” is some number. I suggest choosing the greatest non-RC number available to you (3.8 at the time of writing this tutorial, although as you can see in the screenshot, 3.7 is also available to me).
Verify the legitimacy of the software by checking that the Python Software Foundation is the publisher of the software, then click the big blue “Get” button.
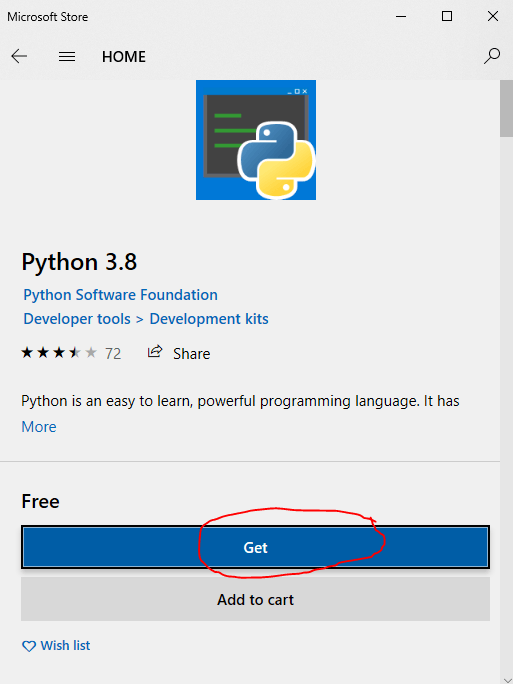
The button will be replaced by a meter indicating your download and installation progress.
When finished, you can close the Store app.
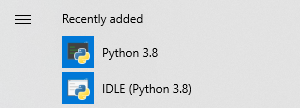
Click the Windows icon in the bottom-left corner of your screen – at the top of your start menu, you should see “Python #.#” and “IDLE (Python #.#)” software added. (Alternatively, they should be under “P” and “I,” respectively, in your start menu’s main list of programs.)
If you’d like, you can click one of them and try running print('Hello') right from the Python command prompt windows they bring up, but personally, I don’t like interactive Python command lines. I usually need to write multiple-command script files and execute them.
Some tech details for nerds
Skip this little list if it doesn’t make any sense to you
- The Windows Store seems to install copies of the Python interpreter (a.k.a. the program
python.exe), which makes your computer understand code written in the Python programming language at both these two places – I’m not 100% sure which it’s really using, since usingwhere pythonin the command line tells me one thing but various informational messages in VSCode tell me another:C:\Users\YOUR_USERNAME\AppData\Local\Microsoft\WindowsApps\C:\Users\YOUR_USERNAME\AppData\Local\Microsoft\WindowsApps\PythonSoftwareFoundation.Python.#.#_LONGWEIRDTEXT\
- The Windows Store seems to install PIP, which helps you install and upgrade Python “modules” (extensions to the programming language) , into the same 2 folders as
pip.exe. - The Windows Store installer seems to do a pretty good job of putting these two executables in your operating system’s
PATHenvironment variable, so that when you simply open a Windows command line and type a command beginning withpythonsuch aspython --version, or one beginning withpipsuch aspip --version, they run properly.
Hello World: running a Python program
Open up a nice text editor like Notepad++.
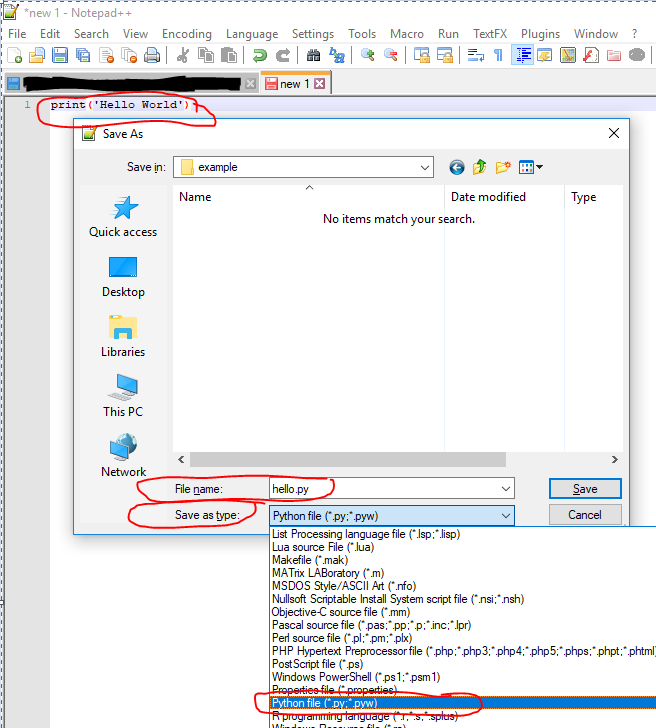
Create a new file. In it, type the following text, using the apostrophe key on your keyboard for the single quotes:
print('Hello World')
Do “File -> Save As.”
Pick a nice folder for your program (personally, I’m going to save mine under C:\example\, but you might want to put it on your desktop) and save it there with a filename of “hello.py,” being sure to change the “Save as type” option to “Python file” or to “All Types (.).”
Once you’ve done that, open a “command-line prompt” by hitting the Windows key on your keyboard, typing “cmd,” and hitting “enter.”
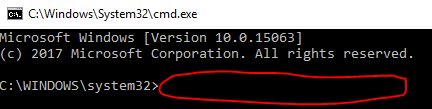
At the prompt, type something along the following lines, only changing the file paths to be where your “python.exe” lives and where your “hello.py” lives, and hit your enter key:
python c:\example\hello.py
You should see “Hello World” right below your command.Go you! You just wrote a program in Python and executed it!

IDEs
Setting up an IDE for pleasant programming
That wasn’t a particularly fun way to code, was it?
If you’ve practiced coding in an online “IDE” like Repl.it or CodeBunk, you know that coding can be as easy as clicking a big “run” button every time you type enough text that you wonder what it does.
To get the same experience, we need to install an “IDE” on our PC.
A popular one is Microsoft’s VSCode.
Install VSCode
Installing VSCode is a straightforward process of downloading the software from Microsoft’s web site and double-clicking the installer file, then following directions as prompted.
I don’t have screenshots because it was already installed on my computer. I have admin rights to the computer I was working on, so please let me know in the comments if this tutorial doesn’t work for you in a pure no-admin-rights context – I suspect I installed VSCode for the whole computer when I installed it.
Microsoft has some tips on installing VSCode for a local user, without admin rights, here.
Once you’ve installed VSCode, run it.
Python-ifying VSCode with a plugin
At the far left of VSCode, click the bottom icon that looks like a square joining 3 other squares to make a bigger square. This will bring you to the Extensions section of VSCode.
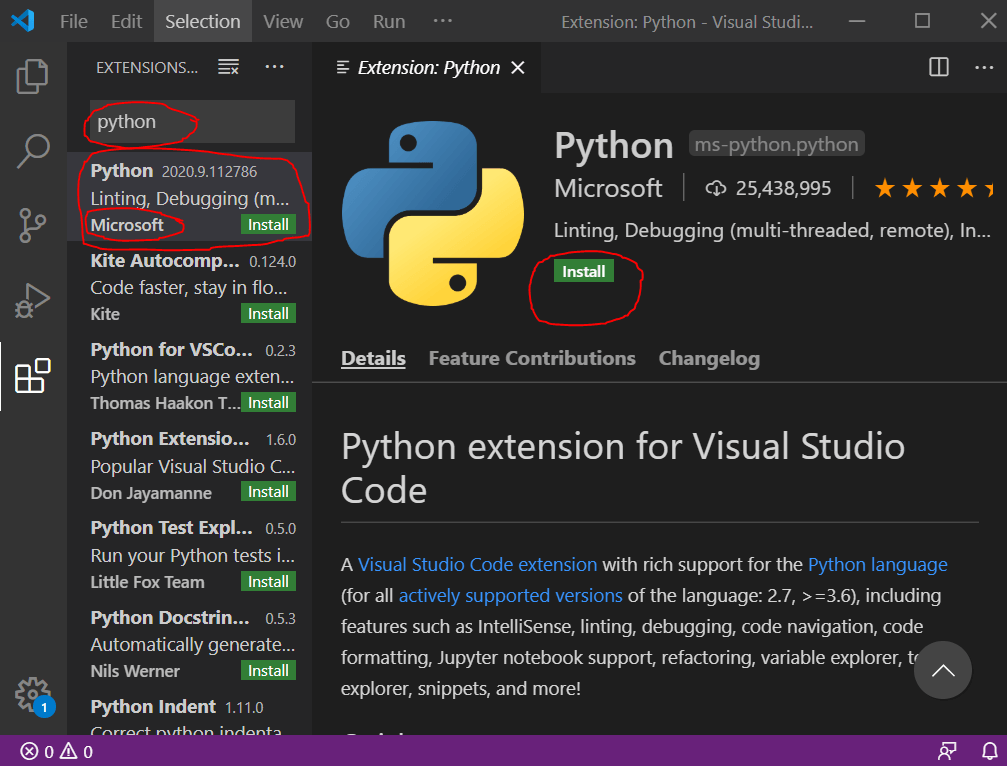
In the search box at the top of the left-hand control for Extensions, type “python” and click the official Python plugin published by Microsoft itself.
Click the green Install button.
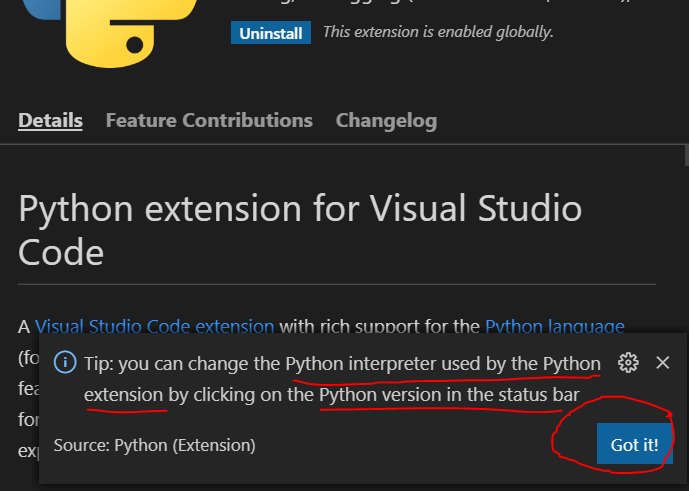
When your extension finishes installing, it might let you know that there’s a way to change which Python interpreter VSCode uses to facilitate executing code written in the Python programming language.
Go ahead and click “Got it!” if so.
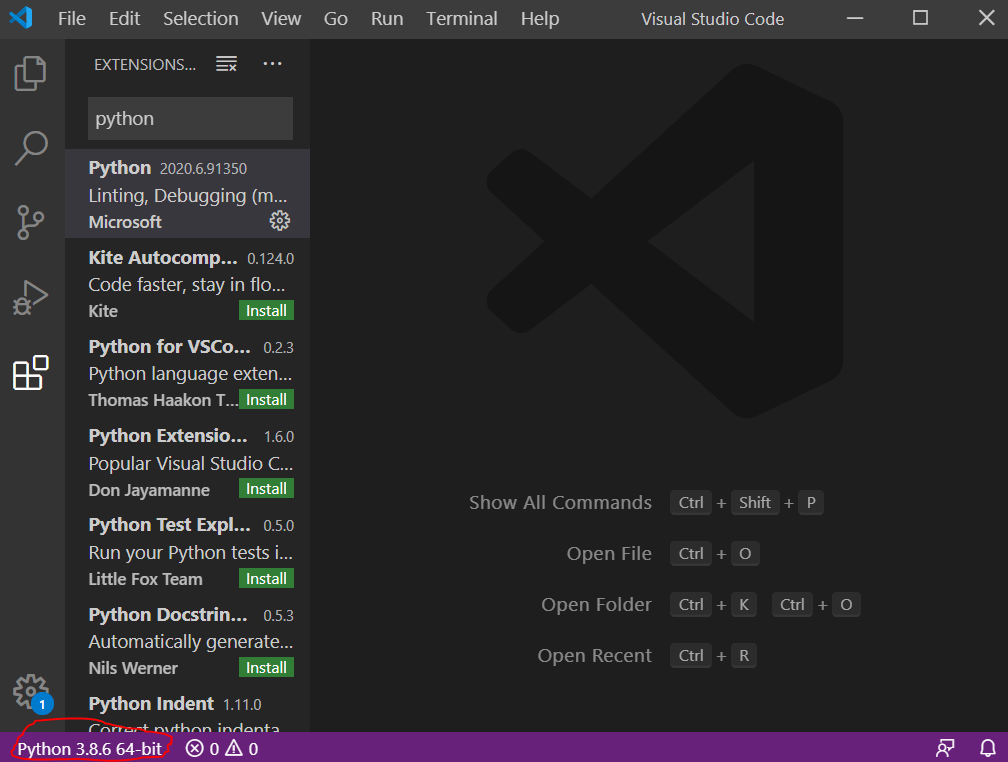
Just for fun, click “Python #.#.# 64-bit” in the bottom-left corner of VSCode.
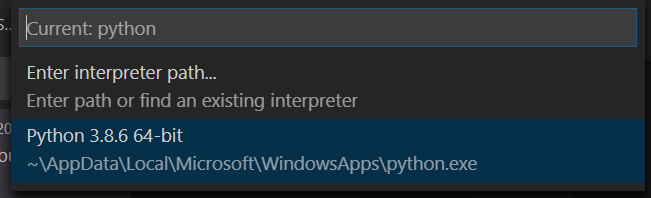
VSCode’s command pallet will open toward the top center of VSCode and give you an option to choose which python.exe installation on your computer you’d like it to treat at the Python interpreter on your computer.
(Programmers sometimes keep multiple versions of Python installed on their computer all at once.)
Click anywhere outside this command pallet menu to get rid of it. I just wanted to show you around in case you were curious.
Using our IDE to program
Close VSCode and fire it up again. You might not see Python #.#.# 64-bit in the bottom-left corner of VSCode anymore.
That’s okay – you can bring it back by navigating through the top menu to File > Open File and opening the file you saved at, for example, c:\example\hello.py.
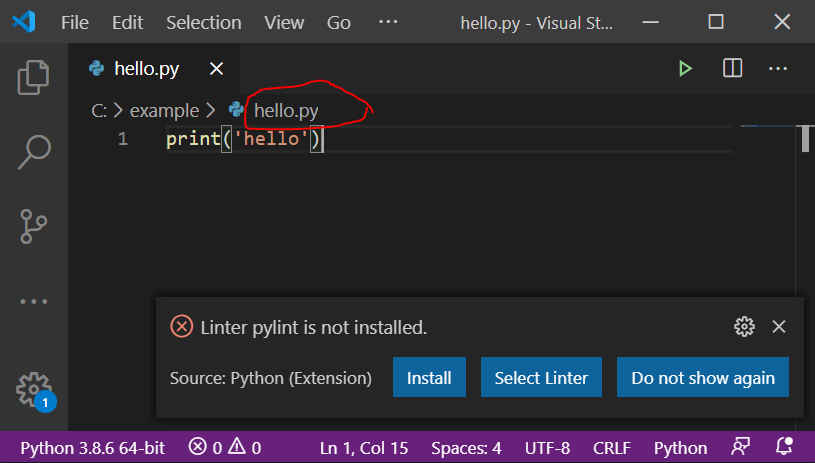
(Note: I closed out of the tip that popped up telling me I hadn’t yet installed a “linter.”)
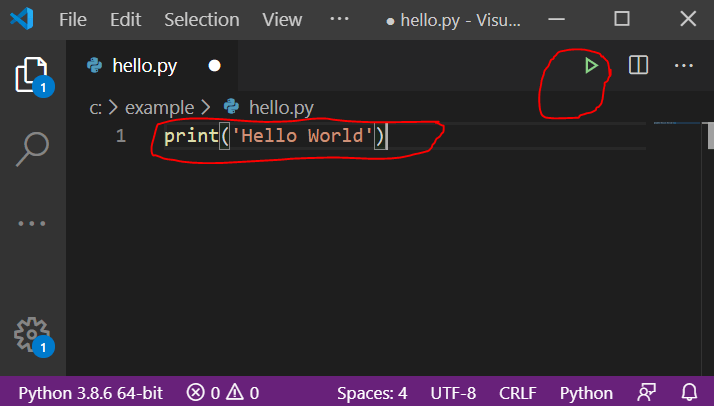
You should see that hello.py contains the following code:
print('Hello World')
To run this code, click the green right-facing triangle (the “play button” / “run button”) toward the top right corner of VSCode.
If it gives you a drop-down menu, choose “Run Python File in Terminal.”
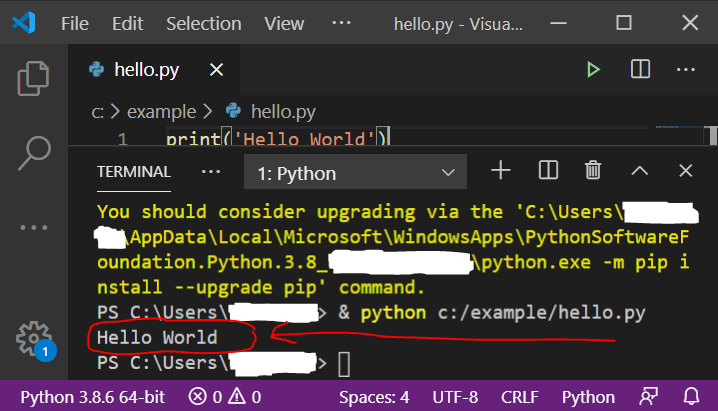
In the “Terminal” tab of a panel below your code, you should see the words:
Hello World
It should appear between “command prompts” that say:
PS C:\Users\YOUR_USERNAME>
Now erase the entire contents of the file, and on line 1, type:
print('Hello again')
Then click the big green “run” button.
In the “Terminal” output below, do you see the following output text?
Hello again
Congratulations – you’ve set up VSCode and you’re almost ready to write bigger programs!
In the top menu, click “File” -> “Save” because why not be proud of this working code? It’s good to get used to saving your work as soon as you like it.
Some tech details for nerds
VSCode should have filled in the command prompt before “Hello World” with something along the lines of & python c:/example/hello.py.
The command prompt after “Hello World” should be available for you to type commands into.
Try typing “python --version” and hitting enter to confirm that you have a working command prompt to your computer through this panel of VSCode.)
You’ll be using the Terminal’s command prompt when you need to update extensions to Python, so you might as well try your first command in it.
Modules
Checking whether “modules” are installed
Now you need to learn what it looks like when a given extension to the Python language, also known as a “library” or “package” or, particularly in Python, a “module,” is installed.
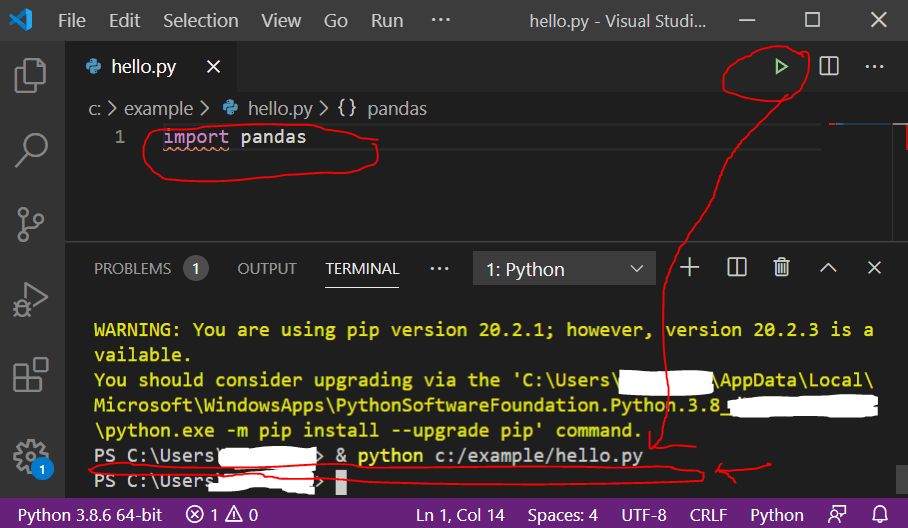
Backspace out the entirety of your code and on line 1, type:
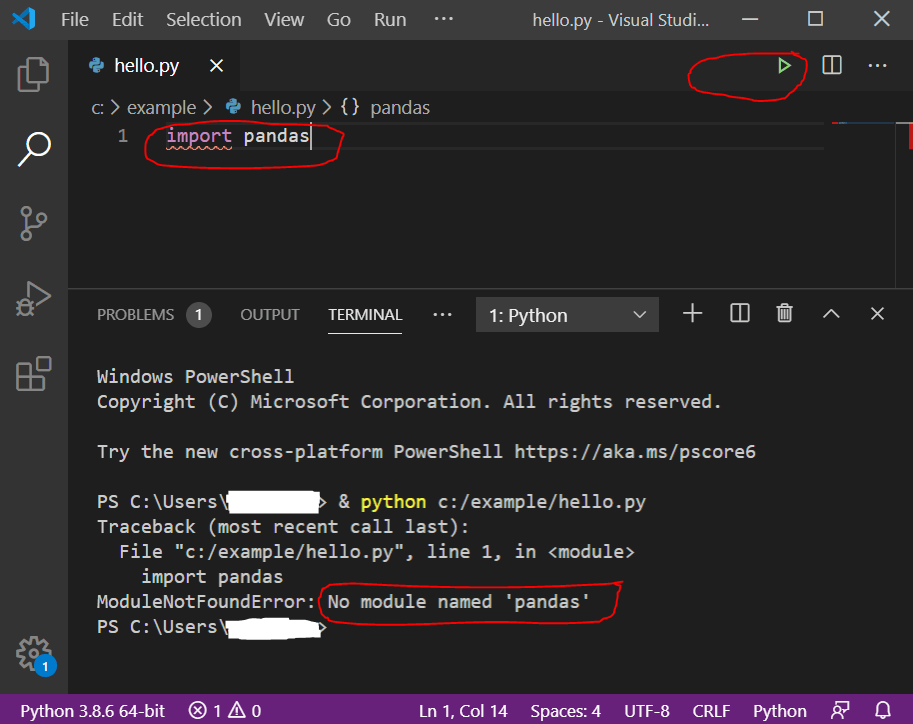
import pandas
Click the “run” button.
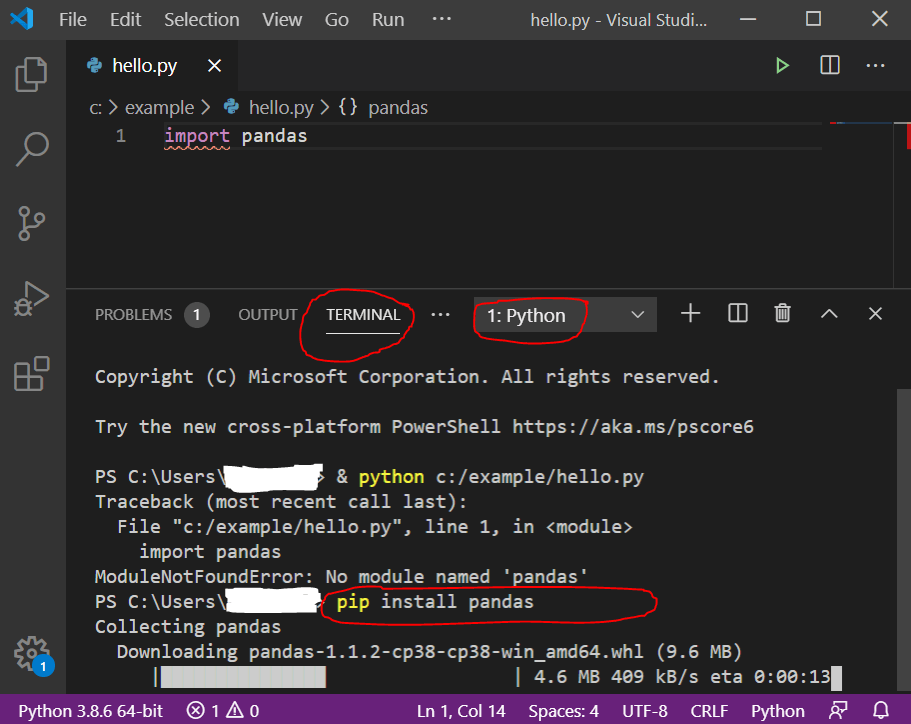
If you get a dump of text in your console, saying the following, you now know that you don’t have the module called “pandas” installed:
Traceback (most recent call last):
  File "C:/example/hello.py", line 1, in <module>
    import pandas
ModuleNotFoundError: No module named 'pandas'
If you do have “pandas” installed, nothing special happens.
If you have “pandas” installed, when you run this code, you just get a new command prompt (“PS C:\Users\YOUR_USERNAME>”) in the Terminal pane below.
Let’s fix things and install Pandas so our code runs.
Installing a “module”
When using the Windows Store installation of Python, you’ll use the “pip installer” to install extended Python commands (“modules”) onto your computer so that you can run Python code written with these extended commands.
PIP is just a command-line program that works in the command prompts of the Terminal pane of VSCode. It goes out and downloads things from the internet and installs them on your computer for you.
In the command prompt in your Terminal pane in VSCode, type the following and hit “enter” to execute:
pip install pandas
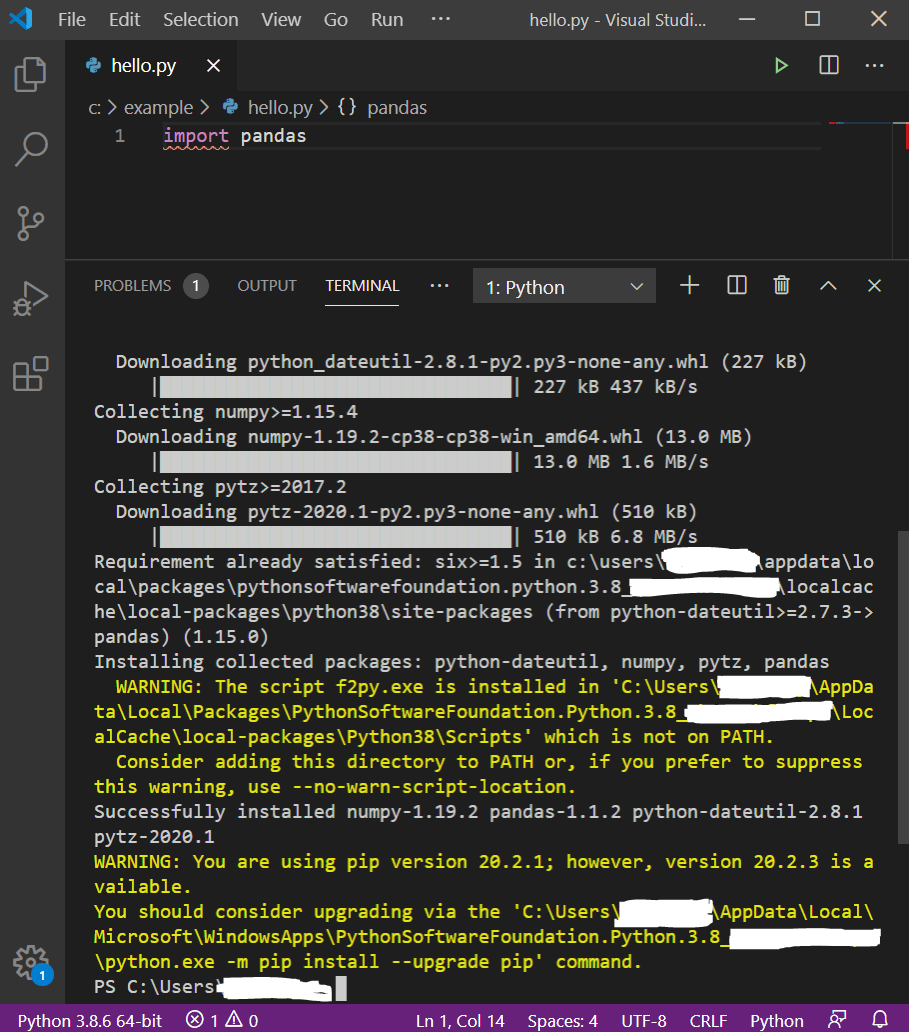
You may notice that PIP downloaded a lot more than just “pandas.” There’s another package that’s highly intertwined with “pandas” called “numpy” that it’s going to download for us … we’ll check after we’re all done that it installed, too.
The download and install takes a few minutes.
The installation process is completete when you see a new command prompt (“PS C:\Users\YOUR_USERNAME>”) at the bottom of your the Terminal pane in VSCode.
Run your code again, which, as a reminder, looks like this:
import pandas
Now you should get the boring “nothing happens except the command prompt incrementing” thing.
Note: If you’d like to see that the “numpy” module also installed, add a 2nd line of code to your program at left and click “Run” again, with the full code being:
import pandas
import numpy
Installing another module
The same process works for other Python modules, like Simple Salesforce, which makes it easier to download and update data in a Salesforce database.
Running the following code will produce an error if Simple Salesforce is not installed, but will do nothing if it is installed:
import simple_salesforce
To install Simple Salesforce on your computer, just run this command in the VSCode Terminal command prompt:
pip install simple-salesforce
Note: in pip commands, this module is “simple-salesforce” with a hyphen. When doing an “import” in Python code, it’s an underscore. Not sure why … that’s just how the author packaged it up.
Updating a “module”
Has it been a year, and you’ve heard there are newer & greater versions of Pandas?
At your prompt in the VSCode Terminal, run the following command:
pip install pandas --upgrade
Updating Python itself
If you have, say, version 3.8.0 and you want to bring your system up to the latest version offered in the Microsoft Store (for me today, that’s 3.8.6), you might be able to do so as described in “How to manually update apps and games from the Microsoft Store” by Ciprian Adrian Rusen for Digital Citizen.
If, on the other hand, you chose version 3.7 of Python and want to switch to version 3.8, I think the easiest way to ensure you keep your installation simple would be to simply uninstall Python the way you’d install any program from Windows, then reinstall it.
The only catch is that this will likely uninstall all the modules you’ve installed with pip. Maybe you want a clean start, but for this tutorial, we’ll take a backup of the list of those modules before we begin and reinstall them when done.
- In your VSCode Terminal panel, type the command
pip freeze > c:\example\installed-modules.txt(changing the path of the filename to the right of>if you like) and press Enter to execute it.- Check out the file you just created – it should list out the Python modules installed on your computer.
- Click the Windows icon in the bottom-left corner of your screen, and then without clicking anything else, type the words “
add or remove programs.” - The Windows start menu should filter your list of available programs to suggest the Add or remove programs system configuration area. Click it.
- In the “Search this list” box, type “
python,” click your version of Python that you no longer want, and click the Uninstall button. - You’re now in a bit of a weird nowhere-land, where executing a VSCode Terminal command of
python --versionneither gives you a version number nor denies thatpythonis a legitimate Windows command. If you have a.pyfile open in VSCode, the bottom right corner also probably gives you a yellow warning message of “Select Python interpreter.” Hopefully we can move past that in a moment.- Nerd reason: The uninstall left behind
python.exeinC:\Users\YOUR_USERNAME\AppData\Local\Microsoft\WindowsApps\, so it’s still a valid Windows program. - However, that program’s job seems to be to simply call the
python.exefrom a sub-folder (e.g.PythonSoftwareFoundation.Python.#.#_LONGWEIRDTEXT) with an actual versioned installation of Python in it, so executingpythonjust kind of … does nothing.
- Nerd reason: The uninstall left behind
- Once the Windows Store finishes installing your new version of Python, close out any
.pyfiles you have open in VSCode. - Re-open a
.pyfile such ashello.pythat we wrote earlier. VSCode should automatically find your new Python interpreter and put your latest version number into the bottom-left corner. - Run your Python file to make sure it works.
- Tip: Choose a Python file that doesn’t do anything dangerous. Don’t, for example, choose a Python file you once wrote whose job is to delete a bunch of files. Use a simple Hello World script.
- To restore your old module installations, run the following code in the VSCode Terminal:
pip install -r c:\example\installed-modules.txt(alter the file path if you saved it somewhere else) - Run a Python file containing
importstatements in the code to verify that your expected modules are now in place, as done above withimport pandasandimport numpyandimport simple_salesforce.
After updating Python, you might also want to update all of your modules at once to their latest versions.
You can do so with the following command suggested in this blog post by ActiveState:
Updating all modules at once
pip freeze | %{$_.split('==')[0]} | %{pip install --upgrade $_}
Updating PIP
Funnily, pip itself doesn’t get upgraded when you “update everything,” so if you’re seeing nastygrams that it’s out-of-date, you can also run:
pip install pip --upgrade
Happy Programming
You now have a working environment for editing CSV files in Python!
- You have an “IDE,” or as I like to think of it, a “text editor with a run button,” called VSCode, that runs code you type into it as you see fit.
- You know how to install & update “modules” that you hear might be useful.
(Be careful and don’t trust any old module you find on the internet. It’s nothing more than “custom code that you’re running on your computer. Make sure it’s not from someone sketchy. Big names likepandasare fine, though.)
Door Prize
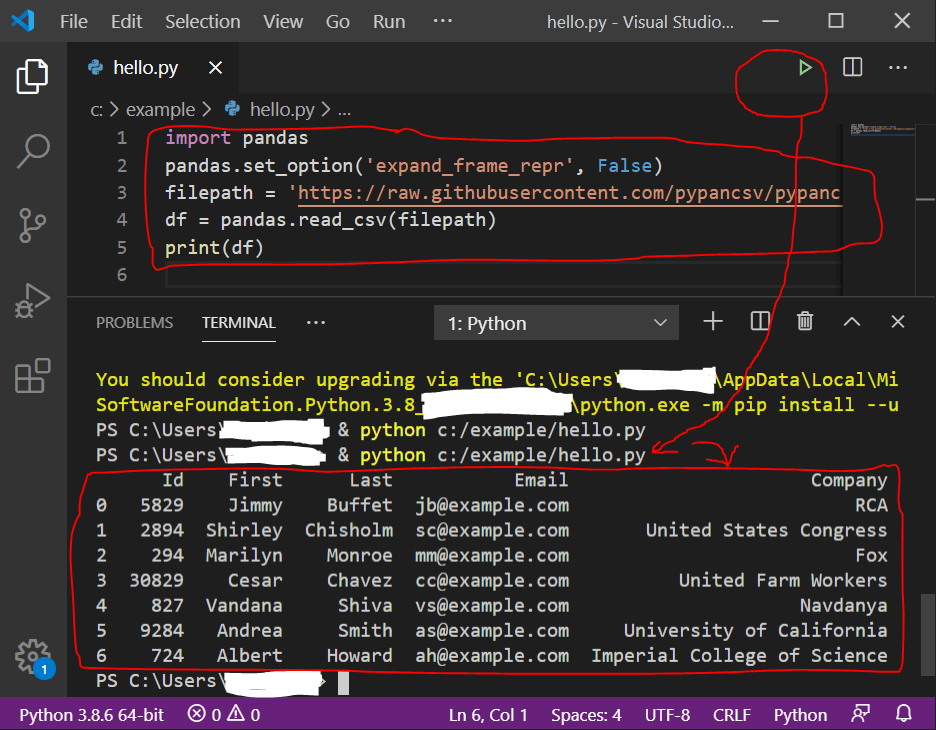
Here’s a “door prize script” to get you started: try copying & pasting it into hello.py in VSCode and running it.
import pandas
pandas.set_option('expand_frame_repr', False)
filepath = 'https://raw.githubusercontent.com/pypancsv/pypancsv/master/docs/_data/sample1.csv'
df = pandas.read_csv(filepath)
print(df)
You should see the following output in your console at right:
      Id    First      Last           Email                      Company
0   5829    Jimmy    Buffet  jb@example.com                          RCA
1   2894  Shirley  Chisholm  sc@example.com       United States Congress
2    294  Marilyn    Monroe  mm@example.com                          Fox
3  30829    Cesar    Chavez  cc@example.com          United Farm Workers
4    827  Vandana     Shiva  vs@example.com                     Navdanya
5   9284   Andrea     Smith  as@example.com     University of California
6    724   Albert    Howard  ah@example.com  Imperial College of Science
Now you’ve opened a CSV spreadsheet file with Python – you’re off to the races! Head here to learn new skills and put them in action on your computer.
