Movable page builder components in Sanity CMS
27 Oct 2020
Previously, I designed a data structure in the “front matter” of Markdown files that was ready to be “dragged around” a content management system – and hence a web page – by a content author, providing a Squarespace-like experience.
I’ve spent enough time dinking around in Sanity CMS that I’m ready to share how I built the same data model inside of it.
End goal HTML
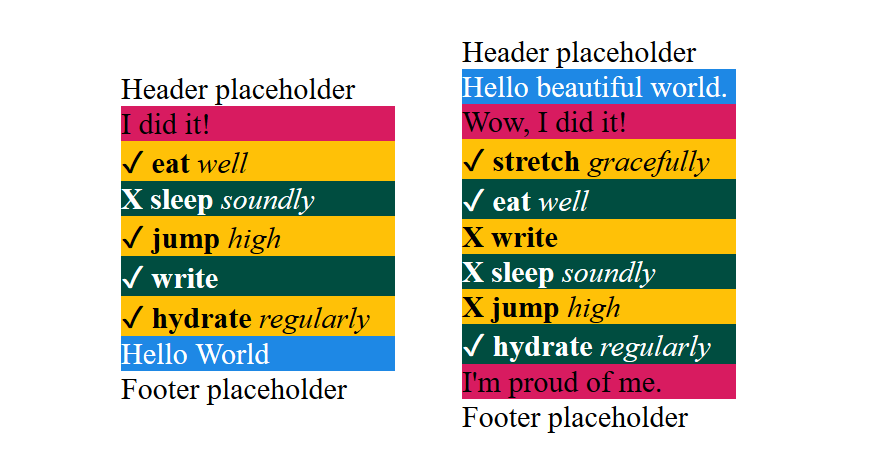
As before, I’m trying to build a home page that looks like this:
Header placeholderI did it!✓ eat wellX sleep soundly✓ jump high✓ write✓ hydrate regularlyHello WorldFooter placeholder
However, I want it to be easy for an author to edit and re-order, and even add sections so that perhaps they look like this:
Header placeholderHello beautiful world.Wow, I did it!✓ stretch gracefully✓ eat wellX writeX sleep soundlyX jump high✓ hydrate regularlyI'm proud of me.Footer placeholder
Page data structure
Conceptual
This is essentially the user interface that many content management systems (CMSes) are in the business of providing to web site content authors.
Designing content for web pages as a list of sections, each of which might just have simple details (a.k.a. “properties” or “attributes”), or which might contain further lists of subsections / items, is a choice often referred to as making a page builder experience for content authors.
Real sections, of course, wouldn’t be silly prototypes like “pink” and “blue” and “task list.” They’d be ideas like “hero,” “feature,” “call to action,” “FAQs,” “preview cards,” or “testimonials.”
Technical
Many CMSes, including Sanity (the one I’ll be configuring in this post), allow programmers to extract data represented in the JSON punctuation standard, which is basically a computer-readable way of writing a bulleted list.
Among other uses, the extracted CMS data can be fed into a tool like a static site generator to build a web site.
Here’s an example of the JSON representation of my bulleted list doodle representing the “sections” of the web page I want to make.
Sanity configuration files
I’ll presume that this isn’t your first project with Sanity. If it is, please go do the project at Sanity Minimum Viable Build to learn your way around.
This post follows all the same steps that I took for the “minimum viable build,” except that my files in the schemas folder are different.
I also put a few extra icons into a folder called static because Sanity stopped offering them built as a built-in feature of its “Sanity Studio” editing interface.
A copy of my full Sanity configuration codebase is in this GitHub repository.
While building the configuration files, they lived in a folder on my computer called c:\example\sanity_movable\.
/schemas/schema.js
schema.js in the schemas folder is the master file defining my Sanity schema.
I’ll use it to tell Sanity about all the other “schema definition” files I create (which in this case, there will be five of).
The contents of mine are:
// First, we must import the schema creator
import createSchema from 'part:@sanity/base/schema-creator'

// Then import schema types from any plugins that might expose them
import schemaTypes from 'all:part:@sanity/base/schema-type'

// We import object and document schemas
import landing from './documents/landing'
import sectionBlue from './objects/sectionBlue'
import sectionPink from './objects/sectionPink'
import sectionTaskList from './objects/sectionTaskList'
import task from './objects/task'

// Then we give our schema to the builder and provide the result to Sanity
export default createSchema({
  // We name our schema
  name: 'default',
  // Then proceed to concatenate our document type
  // to the ones provided by any plugins that are installed
  types: schemaTypes.concat([
    // The following are document types which will appear
    // in the studio.
    landing,
    // When added to this list, object types can be used as
    // { type: 'typename' } in other document schemas
    sectionBlue,
    sectionPink,
    sectionTaskList,
    task,
  ])
})
/schemas/documents/landing.js
I promised schema.js a “landing” schema in the documents subfolder of the schemas folder, so I added a new file at that location called landing.js.
Its contents are as follows:
import icon from '../../static/icons/arrows-alt'

export default {
  name: 'landing',
  title: 'Landing Page',
  type: 'document',
  icon,
  fields: [
    {
      name: 'template',
      title: 'Template',
      type: 'string',
      required: true,
    },
    {
      name: 'slug',
      title: 'Slug',
      type: 'slug',
      required: true,
      description: 'If not happy with what the system generated, you can hand-edit it here'
    },
    {
      name: 'sections',
      title: 'Sections',
      type: 'array',
      of: [{type: 'sectionBlue'}, {type: 'sectionPink'}, {type: 'sectionTaskList'}],
    },
  ],
  preview: {
    select: {
      slug: 'slug',
      template: 'template',
    },
    prepare(selection) {
      const {slug, template} = selection
      return {
        title: `${slug.current} [${template}]`,
      }
    }
  }
}
I promised schema.js and landing.js 3 more schemas in the objects subfolder of the schemas folder: “sectionBlue,” “sectionPink,” and “sectionTaskList”. Consequently, I added 3 more .js-typed files at those locations:
/schemas/documents/sectionBlue.js
import icon from '../../static/icons/bluetooth'

export default {
  name: 'sectionBlue',
  title: 'Section - Blue',
  type: 'object',
  icon,
  fields: [
    {
      name: 'mention',
      title: 'Mention',
      description: 'What text would you like in this "blue" section?',
      type: 'string'
    },
  ],
  preview: {
    select: {
      mention: 'mention',
    },
    prepare(selection) {
      const {mention} = selection
      return {
        title: mention,
      }
    }
  }
}
/schemas/documents/sectionPink.js
import icon from '../../static/icons/cake'

export default {
  name: 'sectionPink',
  title: 'Section - Pink',
  type: 'object',
  icon,
  fields: [
    {
      name: 'say',
      title: 'Say',
      description: 'What text would you like in this "pink" section?',
      type: 'string'
    },
  ],
  preview: {
    select: {
      say: 'say'
    },
    prepare(selection) {
      const {say} = selection
      return {
        title: say,
      }
    }
  }
}
/schemas/documents/sectionTaskList.js
import icon from '../../static/icons/tasks'

export default {
  name: 'sectionTaskList',
  title: 'Section - Task List',
  type: 'object',
  icon,
  fields: [
    {
      name: 'accomplishments',
      title: 'Tasks/accomplishments',
      type: 'array',
      of:[{type:'task'}],
    },
  ],
}
I promised schema.js and sectionTaskList.js 1 last schema in the objects subfolder of the schemas folder: “task”. So I added 1 last file, task.js:
/schemas/documents/task.js
import icon from '../../static/icons/check-box-outline-blank'

export default {
  name: 'task',
  title: 'Task For Me',
  type: 'object',
  icon,
  fields: [
    {
      name: 'task',
      title: 'Task',
      type: 'string',
      required: true,
    },
    {
      name: 'done',
      title: 'Done?',
      type: 'boolean',
      required: true,
    },
    {
      name: 'how',
      title: 'How?',
      type: 'string',
      required: false,
    },
  ],
}
/static/icons/*.js
Finally, I promised all of my individual schema files some “icons” to make the content editing experience pretty: a bluetooth symbol for “blue sections,” a birthday cake for “pink sections,” etc.
I copied a few “.js” files out of older Sanity projects that had installed a NPM moduled called react-icons on my behalf and pasted them into c:\example\sanity_movable\static\icons\.
You can grab copies of them from my repo on Github.
Alternatively, for more icons, install the react-icons NPM package on your computer somewhere. Then find and copy files you like better from within its folder structure. Here’s a nice “React icon” preview tool for deciding which ones you like.
Deploying Sanity Studio
I followed the same steps to “deploy” the configuration files I’d built into Sanity’s cloud as I followed in the “minimum viable build” project.
This created a “Sanity Studio” web site for editing content in my Sanity project.
Data loading
Instead of making our first Sanity “document” by hand, let’s cheat and data-load one in, formatted in the JSON style.
Note that instead of letting Sanity generate an ID for the document, I’m going forcing its _id property to the phrase sample_landings_home.
This will help me data-load an edit if I realize later that I made some typos. (You can make a lot of typos at once with large-scale data migrations. This was a lifesaver with the project I’m in the middle of, migrating Gigpress to Sanity.)
{
 "_id": "sample_landings_home",
 "_type": "landing",
 "template": "landing",
 "slug": {
  "_type": "slug",
  "current": "/"
 },
 "sections": [{
   "_type": "sectionPink",
   "say": "I did it!"
  }, {
   "_type": "sectionTaskList",
   "accomplishments": [{
     "_type": "task",
     "done": true,
     "how": "well",
     "task": "eat"
    }, {
     "_type": "task",
     "done": false,
     "how": "soundly",
     "task": "sleep"
    }, {
     "_type": "task",
     "done": true,
     "how": "high",
     "task": "jump"
    }, {
     "_type": "task",
     "done": true,
     "task": "write"
    }, {
     "_type": "task",
     "done": true,
     "how": "regularly",
     "task": "hydrate"
    }
   ]
  }, {
   "_type": "sectionBlue",
   "mention": "Hello World"
  }
 ]
}
When actually loading the data, I have to use a tool (like the JSMin command of Sun Junwen’s JSTool plugin for Notepad++) to concatenate this one JSON record into a single line of text – no line breaks.
Therefore, what I’ve actually done is create a file at c:\example\sanity_movable\data_samples\sample_landings.ndjson that looks like this:
{"_id":"sample_landings_home","_type":"landing","template":"landing","slug":"/","sections":[{"_type":"sectionPink","say":"I did it!"},{"_type":"sectionTaskList","accomplishments":[{"_type":"task","done":true,"how":"well","task":"eat"},{"_type":"task","done":false,"how":"soundly","task":"sleep"},{"_type":"task","done":true,"how":"high","task":"jump"},{"_type":"task","done":true,"task":"write"},{"_type":"task","done":true,"how":"regularly","task":"hydrate"}]},{"_type":"sectionBlue","mention":"Hello World"}]}
Trivia: the filename ends in .ndjson, not .json, to remind me that it’s not a pure JSON file.
It’s a variant on JSON called “newline-delimited JSON,” which is the data standard Sanity chose for import operations.
In the NDJSON punctuation standard, line breaks need to be avoided with one exception:
If the outermost level of the file is a list, you leave off its [ and ], and you separate members of the list using line breaks instead of commas.
You can grab a copy of this file from my Github repository if you’d like to follow along.
From a command line prompt within the folder c:\example\sanity_movable\ on my computer, I executed the following command:
sanity dataset import data_samples/sample_landings.ndjson YOUR_SANITY_DATASET_NAME_GOES_HERE --replace
Exploring Sanity Studio
Logging into “Sanity studio” as before, I can see my “home page” as an author would see it:
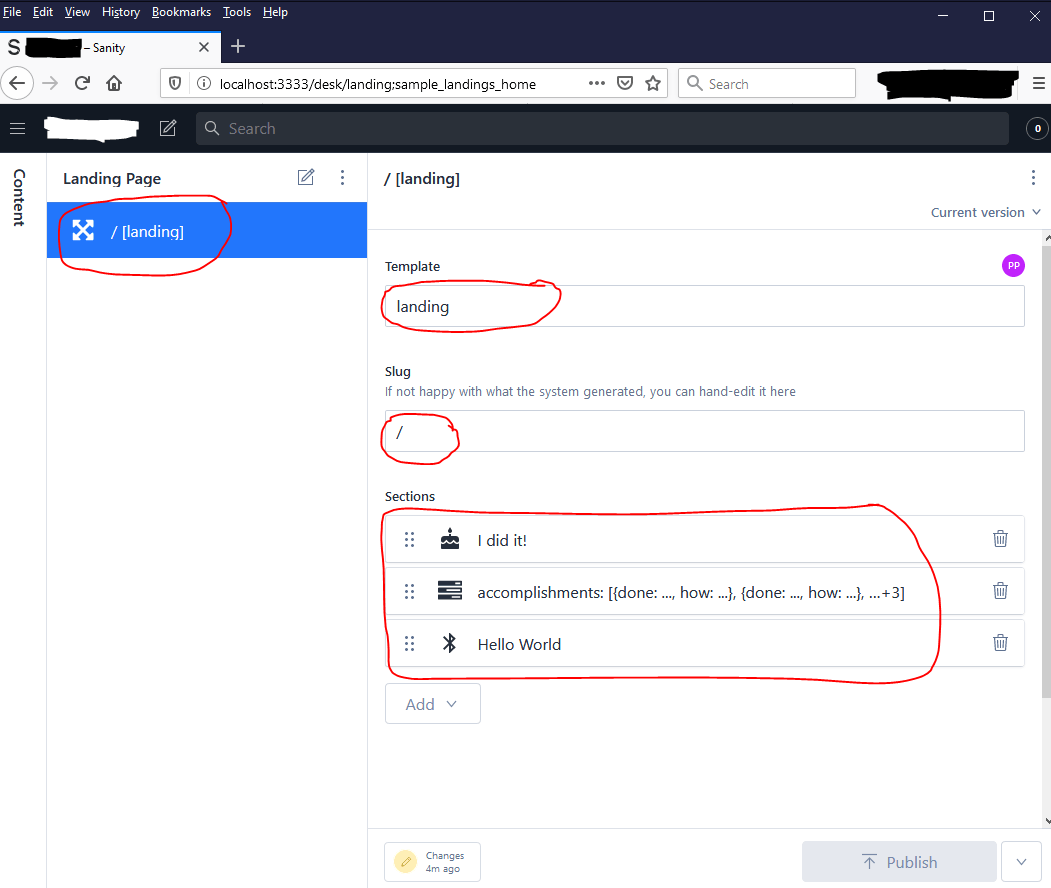
The sections are rearrangeable by clicking the six-dot icon at their far left, holding the cursor down, and dragging them up and down. They’re deleteable by clicking the trash can icon at their far right.
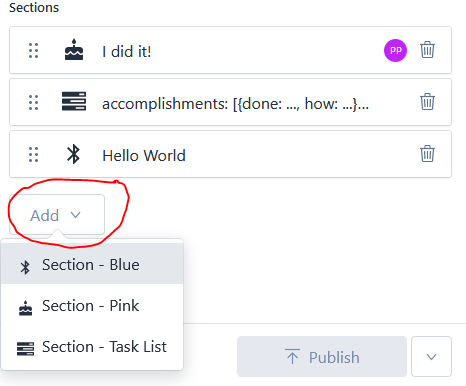
I can add a section, too:
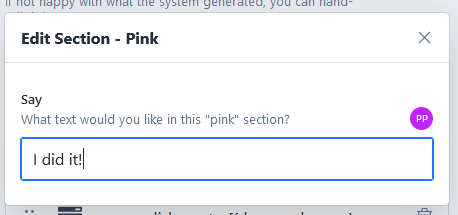
If I click on the section with a birthday cake (a “pink” section), I can edit the value of say from I did it! to something else.
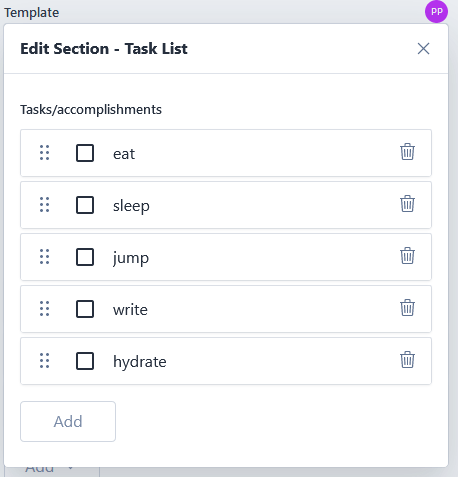
If I click on the section that says “accomplishments”, a panel pops up where I can rearrange, delete, or add tasks:
And, clicking on the task that says “jump”, I can edit its properties.

Planning for web site generation
Sanity does not make web sites
None of what I’ve done in Sanity actually makes “pink” sections appear on a web page with a pink background.
That will be the job of a tool like a static site generator.
All I’ve done with Sanity is set up a nice way to organize my thoughts and to specify that I’d like a “pink”-typed section with the phrase “I did it!” to be the first section on my home page.
For what it’s worth, I made Eleventy build me a web site from this tutorial’s Sanity project – check it out at https://movable-11ty-sanity.netlify.app/ and peek at my 11ty configuration on GitHub.
(Update: this 11ty “page builder” is now available with Git-based data storage, too.)
Test APIs
Your static site generator will have to extract data from Sanity, so it’s probably a good idea to test API access to your Sanity data as before and, if you’re planning to build a web site with Gatsby, to set up GraphQL API access to Sanity.
Webhooks
Sanity is happy to change your data and never tell the server running your static site generator to rebuild your site.
Be sure to configure your static site generation server to rebuild and redeploy your web site upon receiving a “webhook.”
Configure Sanity to talk to that “webhook” every time you publish new content in Sanity.
Live previews
You should also know that for any one “document” you store in Sanity, you (or your static site generator) can do more than just extract the “published” version of it.
If a content author is currently editing the document but hasn’t yet “published” their changes, you can extract details as seen in the latest “draft” or few.
This might not be particularly useful in all site generation tools, but with tools that inject some special Javascript into the pages of your web site (like Gatsby), there are plugins and configuration settings that can make non-production versions of your web site change while your authors edit content.
With tools like that, if an author opened two browsers at once – one for editing content in Sanity, and the other for watching the relevant page of the non-production web site – they could see the impact of changes they’re thinking about making to the data stored in Sanity, live, while they edit and before they click “Publish.”
With more “truly static” site generators like Jekyll, Hugo, or 11ty, “live previews” of draft Sanity content might be a little trickier to implement. Hopefully one day I can get something working and show it off here.
Further reading
- A visual gallery of “web page section” ideas from Tailwind UI, in case you’re confused when I use design buzzwords like “hero” or “call to action”
- How to use structured content for page building by Sanity.io
- Create a page builder in Sanity for Gatsby by Simeon Griggs
- A few more screenshots of a page builder in Sanity by Daniel Kapper
- And even more screenshots of a page builder in Sanity by Mike Wagz

Posts in this series
- Part 1 - Gatsby for novices and dabblers
- Part 2 - Gatsby Minimum Viable Build
- Part 3 - Gatsby React Minimum Viable Markdown Template / Component
- Part 4 - Gatsby React WYSIWYG CMS-Friendly Markdown
- Part 5 - Why WYSIWYG static site CMS's love Gatsby
- Part 6 - Sanity CMS Minimum Viable Build
- Part 7 - Gatsby Minimum Viable Sanity Template
- Part 8 - Gatsby Cloud live previews for Sanity-based sites
- Part 9 - Heroku live previews for Gatsby + Sanity sites
- Part 10 - This Article
