Setting up VSCode to edit Salesforce metadata
10 Apr 2019
A colleague wanted to edit the XML behind Salesforce flows so she could quickly copy/paste entire flows, copy/paste variables within a flow, etc.
That part is easy, but I needed to walk her through setting up her computer to talk to Salesforce about an org’s configuration “metadata.”
Here’re the instructions I sent her for Windows.
Developers, you can skim the deep dive into downloading, editing, and re-uploading a flow’s XML, since you probably already know exactly which files you’re trying to edit.
Administrators, the idea behind this post is that sometimes, it’s faster or easier to change the structure of your Salesforce org by downloading files representing that structure to your local computer, editing them, and re-uploading them to Salesforce.
Think of it like using the “Data Loader,” but for your org’s structure instead of its data.
I hear that copy-paste functionality will be back into the Salesforce Flow web editor as of summer ‘19, so this post’s example code will soon be a bit “dated.”
Nevertheless, the principle that you can make certain changes to your Salesforce org faster with code than you can with clicks may remain true with other pieces of your org’s structure, so I’ll leave the tutorial up even after “copy-paste” comes back in the web-based flow builder.
Did you get VSCode set up?
Yay! I’m thrilled I could help.
If you’d like, I’d love a Ko-Fi. (Chai for me!) 🥰

Need extra help on XML? Download Intro to XML, JSON, & YAML – the book
Painless and simple
The process of trying to edit my org’s “metadata” with VSCode instead of Eclipse was not nearly as bad as I thought it’d be.
For well over a year, having heard bits and pieces of information about “DX,” I thought I was going to have to change everything about the way I pushed code to Salesforce, having been an Eclipse and “Force.com IDE” user for years.
Luckily, thanks to Bonny Hinners, I learned that what Salesforce is pushing as its “SFDX org development model” means “changing nothing about what you do except using VSCode instead of Eclipse.”
Super! No learning new things about SFDX packages! No worrying about managing Git repositories in new ways!
Salesforce’s official support for Eclipse is ending in six months, so it’s nice to have my moves down to make the switch to VSCode myself.
- (Edit: I finally migrated from Eclipse to VSCode.)
Thanks also to Nick Lindberg and Zayne Turner for evangelizing “VSCode for admins” so effectively and persistently (I got the hint!).
Computer admin rights
Note that if you don’t have “administrator” rights on your computer, you may need them – or need someone from your IT department to help you install this software whenever the installers prompt for an “admin password.”
Software to install
There are 3 pieces of software you’ll need to have installed properly on your computer:
- The “Salesforce Command Line Interface” or “Salesforce CLI”
- Microsoft Visual Studio Code, or “VSCode” for short
- The “Salesforce Extension Pack” plugin for Visual Studio Code
Note that a failed installation of any piece of this process could impact the next piece of the process.
Generally, if you have a choice of whether to let the installer add things to your “PATH environment variable,” you want to let them do so (it’s what makes codewords like sfdx be recognized by your computer’s command-line interface as valid commands that can take options and do cool things).
Salesforce’s CLI
Download an installer here from Salesforce.
After you run it, you should be able to test that it worked by opening a Windows command prompt (windows key on your keyboard, type the word “cmd”, hit enter) and typing sfdx --version and hitting enter.
- If you see text about the version as a response, yay. Type
exitand hit enter and move on. - If Windows complains that
sfdxis not a command, something went wrong with the Salesforce CLI install. You’re not going to get far when you try to do stuff in Visual Studio until you fix this.
Microsoft’s Visual Studio Code
Download an installer here from Microsoft.
This is an “IDE,” or “Integrated Development Environment.”
In some ways, you can think of an IDE as a souped-up text editor, like Notepad++.
In this case, it’s the souped-up text editor of choice for dealing with the “metadata” text files that represent the way your Salesforce org is configured.
Like Chrome, there are a lot of Salesforce-related plugins available for it.
Also like Chrome, you really shouldn’t install a plugin without a good reason to trust it.
We’ll start by just installing the ones that Salesforce publishes in our next steps.
For a brief overview of the user interface of VSCode, see the Trailhead module CumulusCI Setup: Review Base Requirements and Install Visual Studio Code.
Salesforce’s plugins for VSCode
These will ensure you have lots of friendly button-click options in VSCode, rather than having to memorize a million annoying commands that start with “sfdx.”
Once you’ve installed Visual Studio Code, visit this page of Visual Studio’s “marketplace” in your web browser and click the big “Install” button at the top.
When your browser asks if you want to open the link with Visual Studio Code, let it.
Follow any prompts, but I think you should be good to go pretty fast.
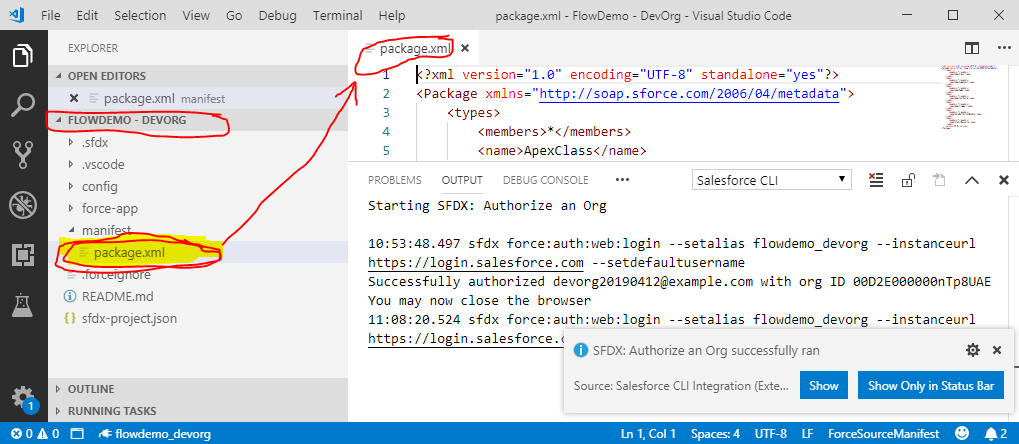
Connect VSCode to a Salesforce org
This official documentation has screenshots of most of the steps below.
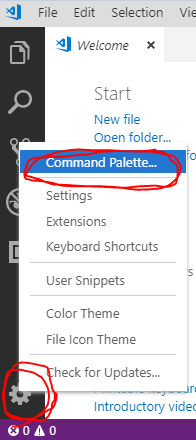
- Click on the little settings gear in the lower-left-hand corner of VSCode and click “Command Palette“
- Start typing “SFDX” and select “SFDX: Create Project With Manifest”
- (Do not use plain-old “Create Project”, which will probably be higher in the list of options)
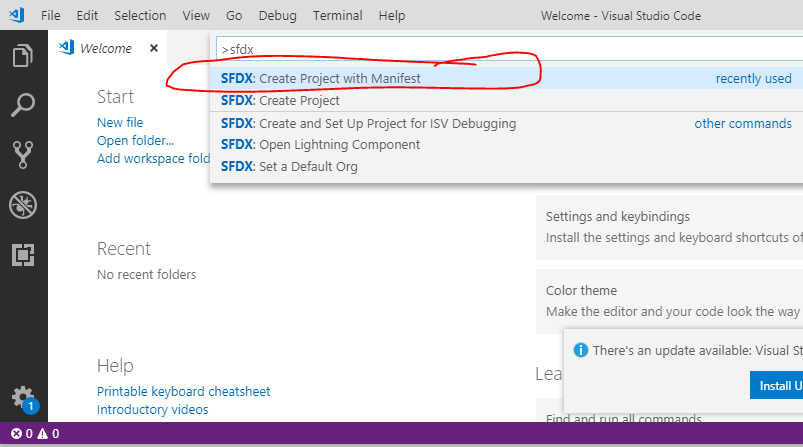
- (Do not use plain-old “Create Project”, which will probably be higher in the list of options)
- In the next pop-up, type a nice meaningful name like “HEDA — Sandbox - Staging”
- (My colleague was connecting to a sandbox called “Staging” in a new org we were spinning up to start from scratch with HEDA).

- (My colleague was connecting to a sandbox called “Staging” in a new org we were spinning up to start from scratch with HEDA).
- In the “Select Folder” Windows Explorer pop-up, create / find / navigate to a folder that seems like a good spot on your hard drive to keep copies of the code representing the contents of the org you’re about to download from.
- For example,
C:\Users\YOUR_USERNAME\Documents\Codebases\Salesforce Orgs\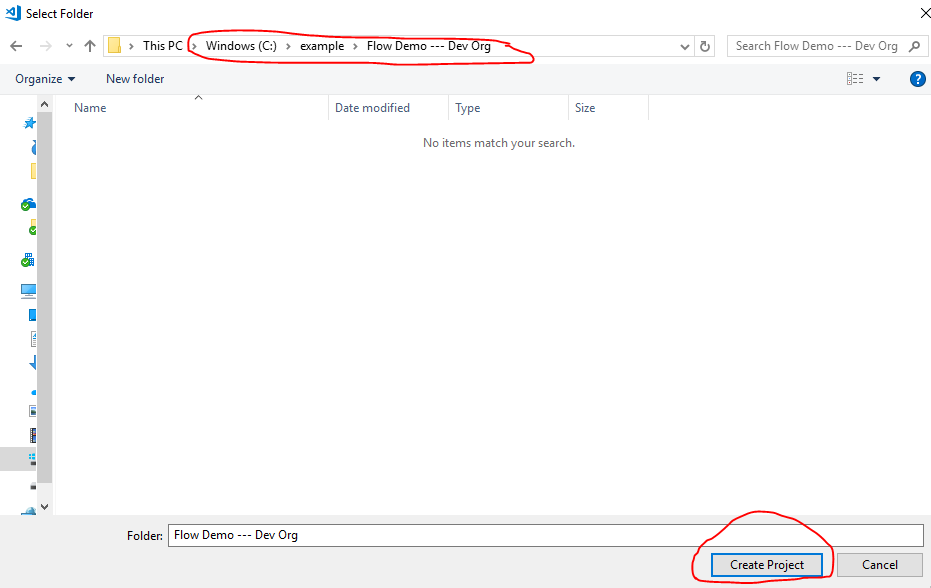
- For example,
- Click the “Create Project” button
- You’ll see a “Welcome” thing with some folder navigation at left that’s collapsible under the phrase “HEDA — Sandbox - Staging,” or whatever meaningful name you came up with.
- At this point, if you were to browse your hard drive, you’d notice a folder called
C:\Users\YOUR_USERNAME\Documents\Codebases\Salesforce Orgs\HEDA --- Sandbox - Staging\or something similar.
- At this point, if you were to browse your hard drive, you’d notice a folder called
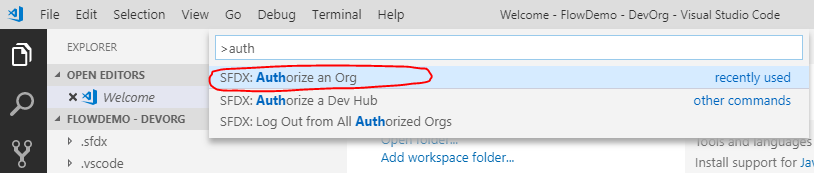
- Click on the little settings gear in the lower-left-hand corner of VSCode and click “Command Palette“

- Start typing “auth” and select “SFDX: Authorize an Org“
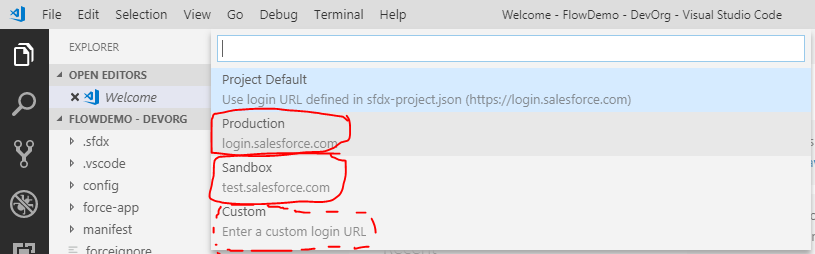
- Choose “Sandbox” if you’re connecting to a sandbox, etc.
- Choose a nice nickname like “
heda_sandbox_staging” and hit enter
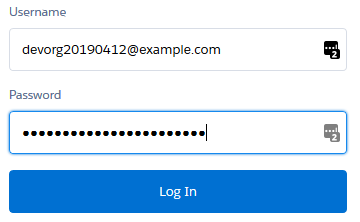
- Your default web browser will bring you to a Salesforce login screen
- (Hopefully your default browser isn’t set to auto-login w/ a saved password to a different org. If not, bail at the step asking to authorize “Salesforce CLI” as you, turn off auto-login in your web browser, and try again from “SFDX: Authorize an Org”, I believe.)
- (Hopefully your default browser isn’t set to auto-login w/ a saved password to a different org. If not, bail at the step asking to authorize “Salesforce CLI” as you, turn off auto-login in your web browser, and try again from “SFDX: Authorize an Org”, I believe.)
- Log in to whatever Salesforce org you’re trying to connect to as yourself.
- Click the “Allow” button letting “Salesforce CLI” interact with Salesforce on your behalf
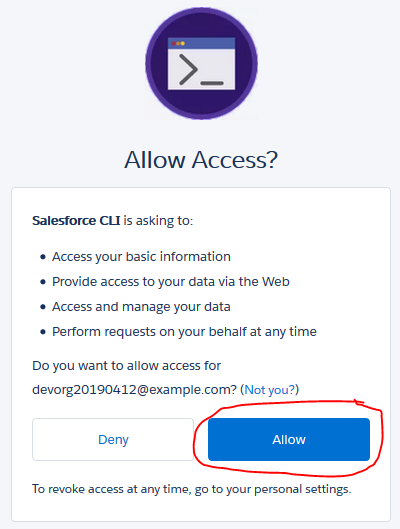
- You can now close the browser tab with that org open
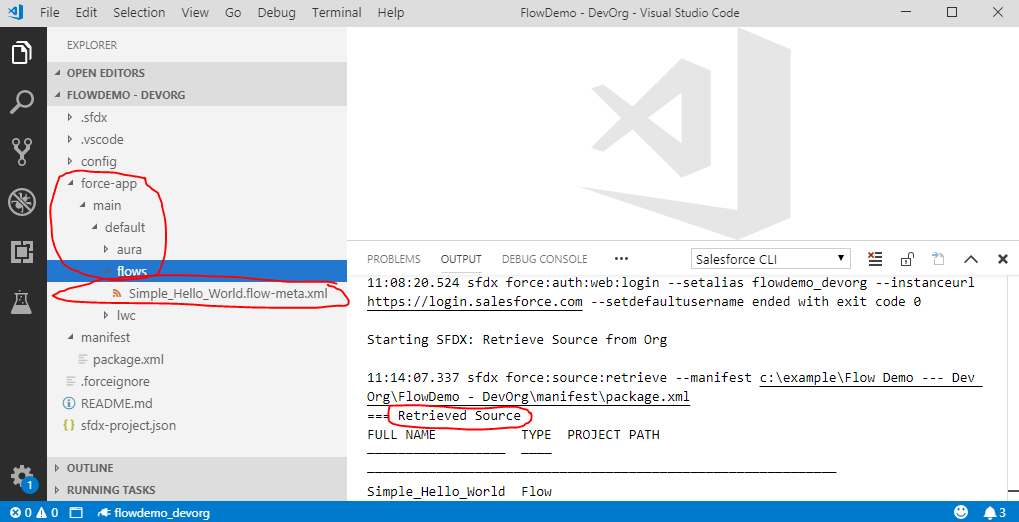
Download metadata files
Now you need to download text files called “metadata” that represent the current state of your Salesforce org onto your computer so that it’s easy to edit their contents.
Salesforce only lets you edit a tiny bit of the “metadata” in your org directly through the web site’s Developer Console (e.g. Apex triggers & classes).
All other “metadata” code has to be downloaded to your computer, edited there, and re-uploaded to Salesforce if you want to edit it directly.
Specify what files to request from Salesforce
- Back in VSCode, at left, under the navigation for the “project” you just created and gave a nice name, expand the folder called “manifest” and double-click “package.xml” to open it in the text editor area of VSCode at right.
- Take a look at the file. It’s full of text formatted in a pattern known as “XML.”
- Do you know how to read XML? Check out my tutorial if not!
- It’s probably about 30 lines long and contains text between “
types” tags with code meaning things like, “Download all Apex classes to my hard drive from Salesforce,” “Download all Custom Settings to my hard drive from Salesforce,” etc.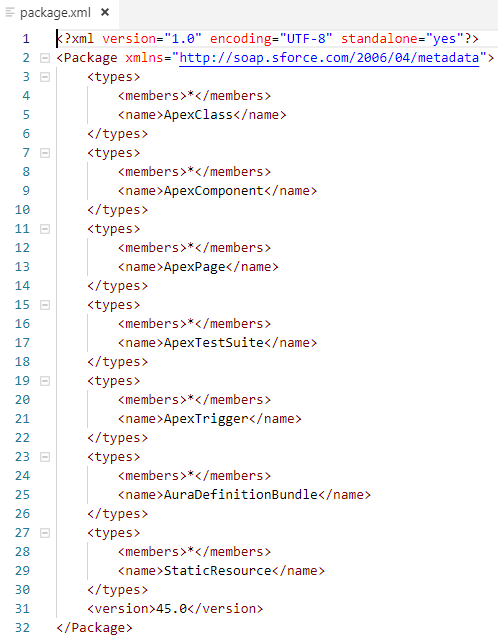
- Edit the file. Carefully. Read my XML tutorial if you’re nervous. What you’re trying to do is leave only “
<type>...</type>” tagsets in the XML you need.- Delete “
<type>...</type>” tagsets you don’t care about (you don’t need to see the details of Apex Triggers if you don’t program them – it’s just going to make the download take longer). - Be sure not to accidentally delete the “
<version>...</version>” tagset from your XML when deleting “<type>...</type>” tagsets you don’t need. - Add new “
<type>...</type>” tagsets you do care about (learning exactly what to type is a bit of an art, but it’s usually pretty intuitive for most things if you start with an example), such as one for “Flow” if that’s what you’re trying to edit. - Official documentation is here
- A slightly overwhelming but official smorgasbord of example contents for a
package.xmlfile is here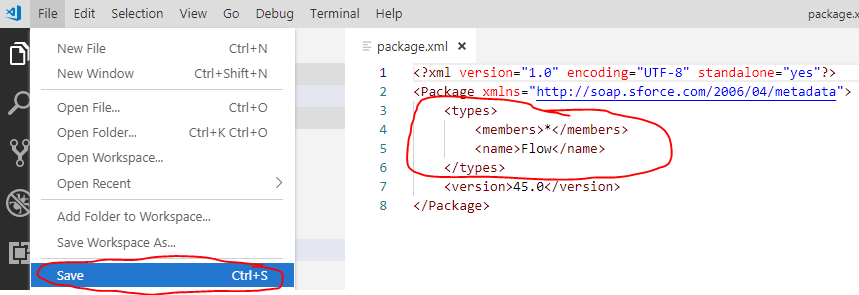
- Delete “
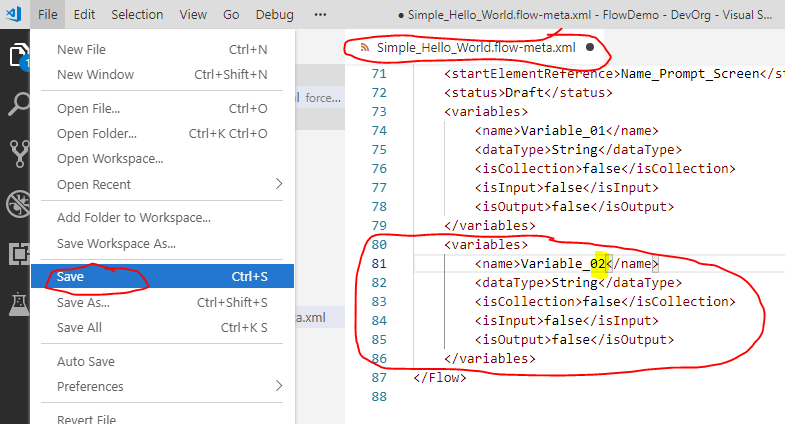
- Save your work. (“Ctrl+S” in Windows or File->Save)
- You can close the editor window for
package.xmlnow.
For example, if you just want flows, you can erase the entire contents of your package.xml file and replace it with this code (perhaps upgrading the version number if you’re reading this much later than I wrote the post):
<?xml version="1.0" encoding="UTF-8" standalone="yes"?>
<Package xmlns="http://soap.sforce.com/2006/04/metadata">
    <types>
        <members>*</members>
        <name>Flow</name>
    </types>
    <version>45.0</version>
</Package>
That’s all that goes in package.xml! Not so bad, right?
(You can always re-edit it later if you want to fetch more or fewer files in subsequent requests to Salesforce.)
Ask Salesforce for the files
This is known as “retrieving” code.
- Right-click on “
package.xml” in the left-nav and click “SFDX: Retrieve Source in Manifest from Org“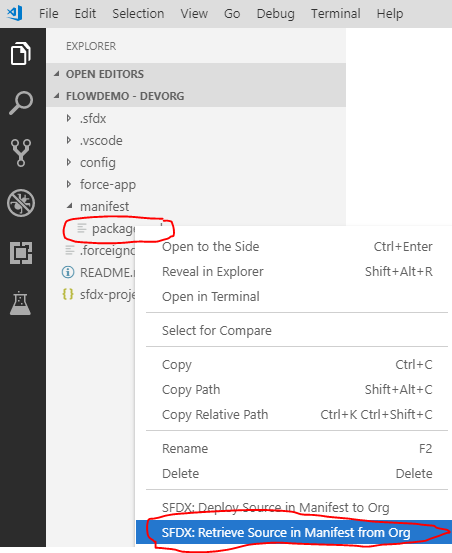
- When the little status box at lower right says you’re all done, close up “Manifest” at left and expand the folders “force-app,” then “main,” then “default,” then “flows” (presuming you meant to download flows).
- Do you see a lot of files? Yay!
- (If not, dummy check: you do have flows or Process Builders in your org, right?)
- (If not, dummy check: you do have flows or Process Builders in your org, right?)
Edit and re-upload a configuration file
Edit a file on your computer
- Open one up in the VSCode file editor by double-clicking it. Make it one that’s still inactive and a first draft, and that you don’t care much about if you break it.
- Make some sort of relatively foolproof edit.
- e.g. Copy & paste a “
<variable>...</variable>” tagset and type a new value inside the “<name>...</name>” tagset embedded within. - Do you know how to read and write XML? Check out my tutorial if not!
- e.g. Copy & paste a “
- Save your work (File->Save or Ctrl+S).
- Close the editor tab for the file you just edited.
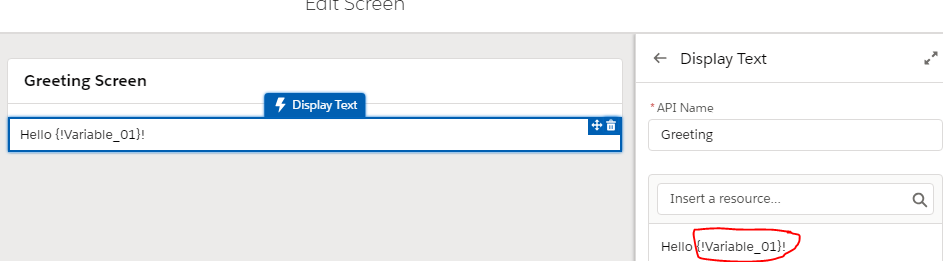
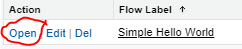
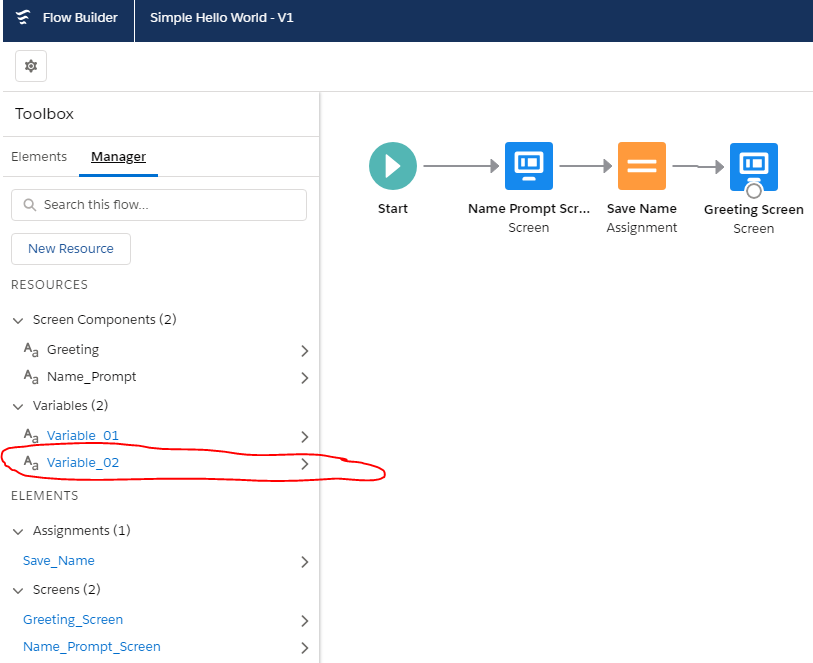
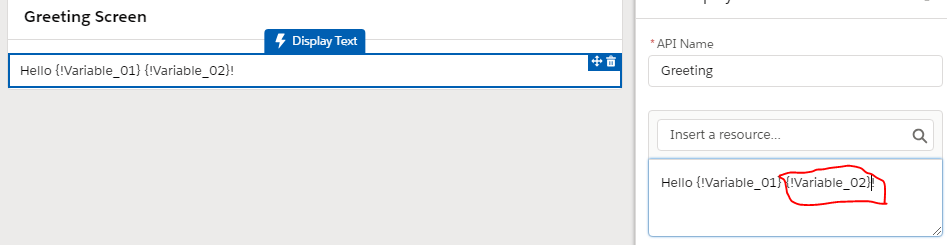
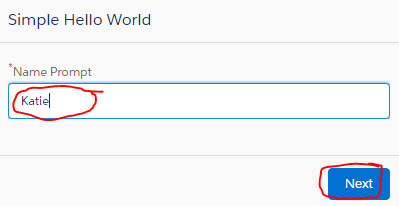
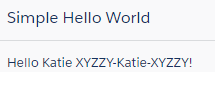
Here’re 4 screenshots of a flow I created with the web in Salesforce.
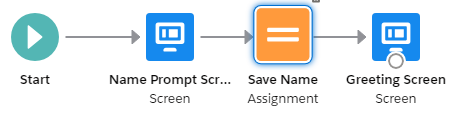
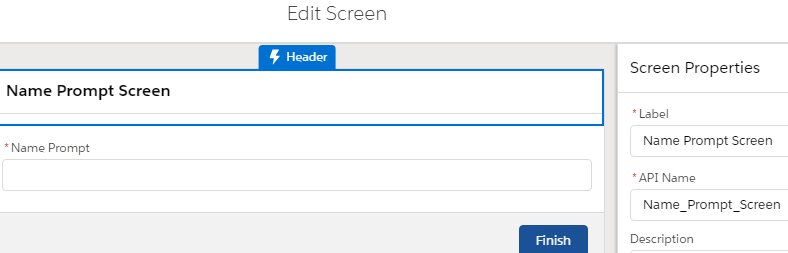
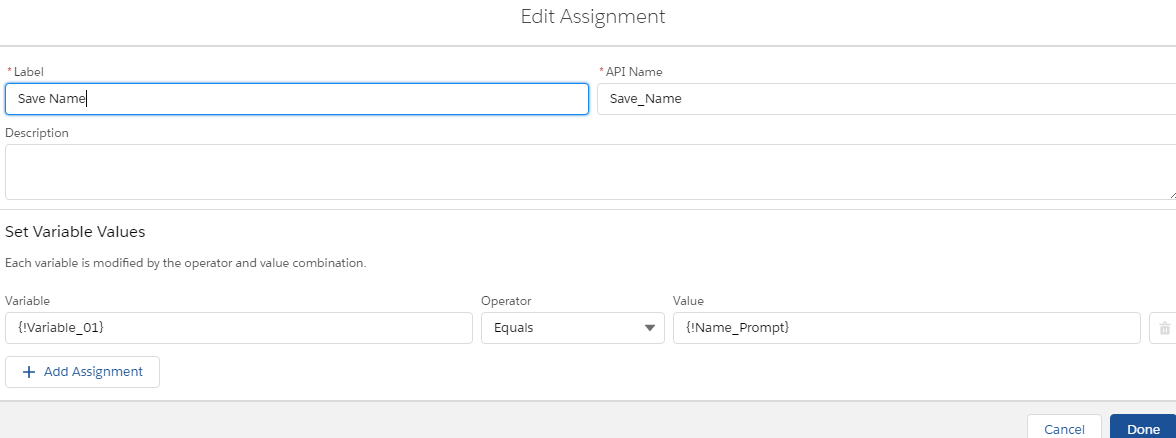
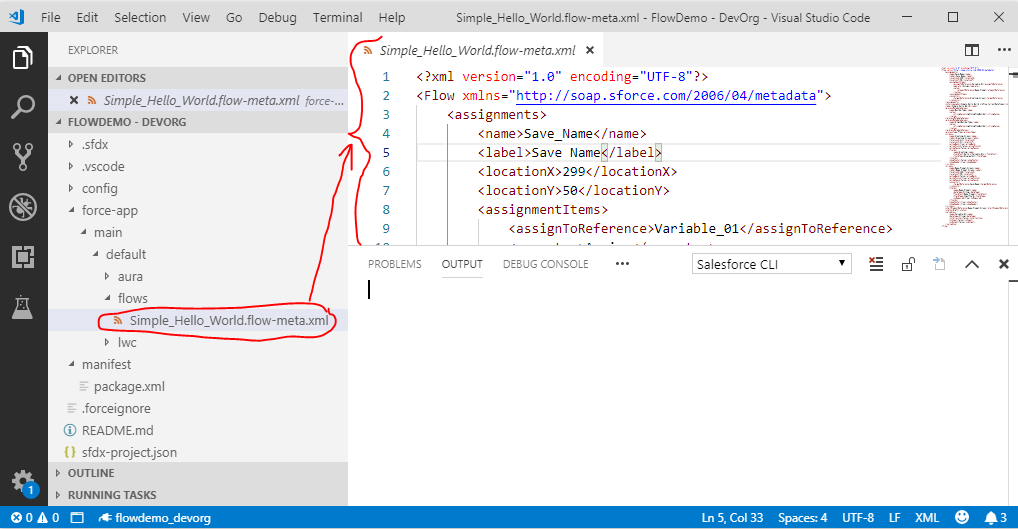
And here’s the XML I downloaded through VSCode that represents it:
<?xml version="1.0" encoding="UTF-8"?>
<Flow xmlns="http://soap.sforce.com/2006/04/metadata">
    <assignments>
        <name>Save_Name</name>
        <label>Save Name</label>
        <locationX>299</locationX>
        <locationY>50</locationY>
        <assignmentItems>
            <assignToReference>Variable_01</assignToReference>
            <operator>Assign</operator>
            <value>
                <elementReference>Name_Prompt</elementReference>
            </value>
        </assignmentItems>
        <connector>
            <targetReference>Greeting_Screen</targetReference>
        </connector>
    </assignments>
    <interviewLabel>Simple Hello World {!$Flow.CurrentDateTime}</interviewLabel>
    <label>Simple Hello World</label>
    <processMetadataValues>
        <name>BuilderType</name>
        <value>
            <stringValue>LightningFlowBuilder</stringValue>
        </value>
    </processMetadataValues>
    <processMetadataValues>
        <name>OriginBuilderType</name>
        <value>
            <stringValue>LightningFlowBuilder</stringValue>
        </value>
    </processMetadataValues>
    <processType>Flow</processType>
    <screens>
        <name>Greeting_Screen</name>
        <label>Greeting Screen</label>
        <locationX>411</locationX>
        <locationY>51</locationY>
        <allowBack>true</allowBack>
        <allowFinish>false</allowFinish>
        <allowPause>false</allowPause>
        <fields>
            <name>Greeting</name>
            <fieldText>Hello {!Variable_01}!</fieldText>
            <fieldType>DisplayText</fieldType>
        </fields>
        <showFooter>false</showFooter>
        <showHeader>true</showHeader>
    </screens>
    <screens>
        <name>Name_Prompt_Screen</name>
        <label>Name Prompt Screen</label>
        <locationX>186</locationX>
        <locationY>50</locationY>
        <allowBack>false</allowBack>
        <allowFinish>true</allowFinish>
        <allowPause>false</allowPause>
        <connector>
            <targetReference>Save_Name</targetReference>
        </connector>
        <fields>
            <name>Name_Prompt</name>
            <dataType>String</dataType>
            <fieldText>Name Prompt</fieldText>
            <fieldType>InputField</fieldType>
            <isRequired>true</isRequired>
        </fields>
        <showFooter>true</showFooter>
        <showHeader>true</showHeader>
    </screens>
    <startElementReference>Name_Prompt_Screen</startElementReference>
    <status>Draft</status>
    <variables>
        <name>Variable_01</name>
        <dataType>String</dataType>
        <isCollection>false</isCollection>
        <isInput>false</isInput>
        <isOutput>false</isOutput>
    </variables>
</Flow>
Wow! That’s a lot of code for very few boxes of Flow Designer, right? I suppose the difference between the visual and text representations of the same concept illustrate the reason that people often enjoy setting configurations with “clicks, not code.”
Nevertheless, the “copy-paste”-ability of the text file can’t be beat.
I’m just going to copy-paste Variable_01 to be a 2nd variable, Variable_02.

Upload the file back to Salesforce
This is known as “deploying” code.
- Back in your navigation menu at left, right-click on the file you just edited and click “SFDX: Deploy Source to Org”
- Unfortunately, you can’t ctrl+click multiple files and deploy them all at once this way. Only one file will actually deploy, even though they all look selected on your screen.
- Deploying an entire folder works by right-clicking it and deploying. (Note: possibly dangerous if others have been editing those other files through the web – you could overwrite their work.)
- Similarly, you can right-click on
package.xmlto deploy all XML files mentioned therein from your computer to Salesforce. This has the same “you might be deploying old code” caveat.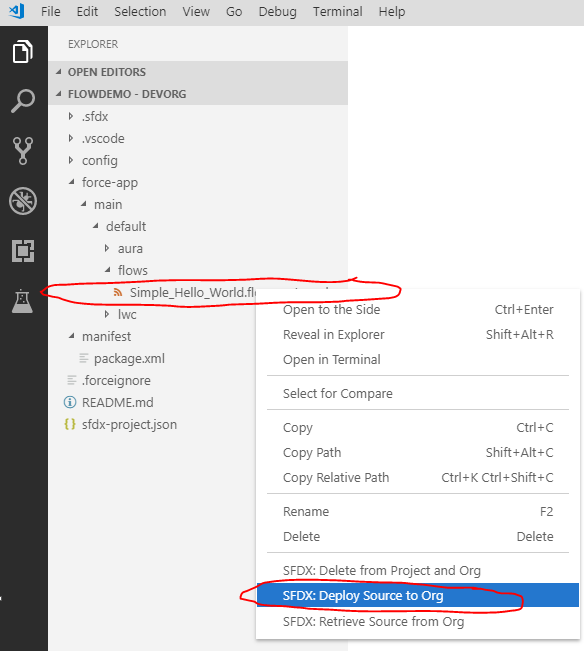
- Once VSCode’s status pop-ups in the bottom right say you’re done…
- Open your Salesforce org, back out of your flow if you were editing it, re-open it, and see if the magic worked! Do you have a new variable in your resources?
Keep the files on your computer up-to-date over time
Now play with your flow in the web interface.
Save some changes.

To ensure you have a fresh copy on your computer before editing the XML representing your flow:
- Open VSCode
- Right-click on the file (or on the package.xml for everything) and do a “Retrieve” instead of a “Deploy.”
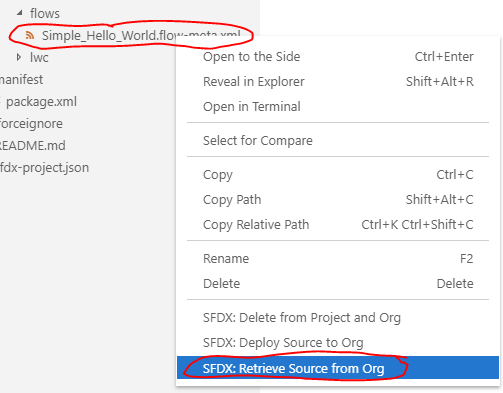

Warning
Caution: Don’t click the adjacent “deploy” option!
Unfortunately, “Retrieve” & “Deploy” are right next to each other.
- Q: Why wouldn’t it be safe to deploy?
- A: As you’re aware if you’re trying to “retrieve” code fresh from Salesforce, the copies of code on your computer are out-of-date.
- Accidentally clicking “Deploy” instead of “Retrieve” could overwrite hard work you’ve done through your web browser with no easy way to recover.
If I use VSCode re-open the XML file containing a representation of my flow, after re-downloading the latest version of it, I can see that it’s longer than it used to be..
Change 1: Within the <assignmentItems>...</assignmentItems> tagset representing the assignment called “Save Name,” an entirely new <assignmentItems>...</assignmentItems> tagset has been added to the code setting the value of Variable_02, just like I did with clicks.
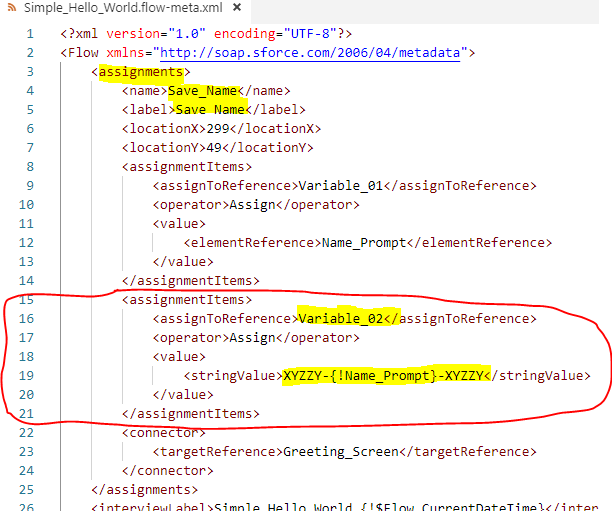
        <assignmentItems>
            <assignToReference>Variable_02</assignToReference>
            <operator>Assign</operator>
            <value>
                <stringValue>XYZZY-{!Name_Prompt}-XYZZY</stringValue>
            </value>
        </assignmentItems>
Change 2: The <screens>...</screens> tagset representing the screen called “Greeting Screen” has been updated so that its “Greeting” display-text field says “Hello {!Variable_01} {!Variable_02}!” instead of “Hello {!Variable_01}!”
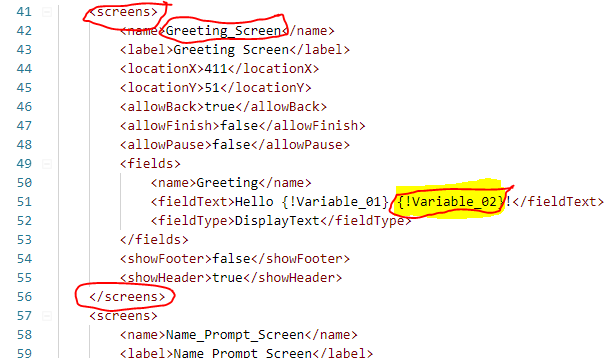
<fieldText>Hello {!Variable_01} {!Variable_02}!</fieldText>
Hooray – I successfully updated my computer’s copy of the XML code to keep it in sync with what’s going on in my Salesforce org through web-based edits.
Your Turn
- If you’re an administrator, I hope you can make yourself more productive with a bit of “code, not clicks”
- If you’re a developer, now you can finally be less afraid of Salesforce ending support for Eclipse.
Thanks for making it all the way through!
Further reading
- It’s still a jumble of thoughts, but I added a new article, “How I set up VSCode for a new Salesforce project,” which is a little more advanced but probably more what I’m up to these days now that I’m also playing with CumulusCI to facilitate “source-driven development” in ways that felt awkward with plain-old SFDX tooling.
- Speaking of which, I’ve also been taking “random handy CumulusCI notes” about CCI.
- Compare Salesforce Flow versions in VSCode
- Under the hood, all of these clicky-buttons in VSCode are running various “command line” commands on your computer that start with the command “
sfdx” on your behalf. If you want to learn some power tricks that completely bypass VSCode (for when you can’t quite get VSCode to do what you want), check out my exercises under “Use SFDX by itself” in my article “SFDX and Git exercises for beginners.”
