Logging into Salesforce's Marketing Cloud API (w/ Python or Postman)
26 Feb 2019
Sometimes, just getting a login acknowledgement from an API is half the battle of using it.
Here, with screenshots, is how I finally logged into Salesforce Marketing Cloud’s API.
I used Python, but most of the steps have nothing to do with code.
Any language that can do HTTPS POST requests will do.
Background
My e-mail expert colleague and I are going to team up and explore which of his “clicks” we can imitate with “code.”
Hopefully, this will help us do great things connecting to secondary Salesforce “orgs” (databases).
Password Precautions
To get this code to work, you have to type secret information into your code that could let anyone who intercepts it imitate you in Marketing Cloud.
That’s not a good thing.
- Only run this code on a computer you trust.
- Only run this code over a network connection you trust.
- If you save this Python script in a file, type “CONTAINS PASSWORD” at the beginning of the filename so you’ll remember it’s a file in which you have to clear out your “Client Id,” “Client Secret,” and “Authentication Base URI” before you close it.
- If you’re working in an IDE that treats subsequent “run” button clicks like one big session (and caches the values of variables from “run” to “run”), leverage that to help you remember to clear out your “Client Id,” “Client Secret,” and “Authentication Base URI” from your file.
Run a few lines of code, with the rest commented out, to fetch an “access token” and save it into a variable called “token.”
Then comment out the “fetching” code, backspace over your secret info, and type the word “SECRET_INFO_GOES_HERE,” and save your script.
Ta da! Now you can stop worrying about whether you left secrets in plain text in the contents of your script. - You’re going to have to get expert advice if you need to store this script and run it in any sort of automated fashion. Typing secrets into the body of the script itself and leaving it there is simply not an option.
1: Admin -> Installed Packages
Log into Marketing Cloud’s web console as an administrator.
Click on the drop-down by your name, top right.
Under “Settings,” click “Administration.”
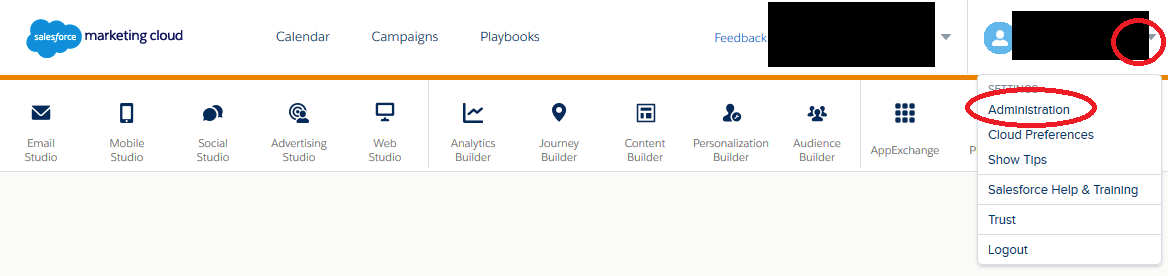
In the top nav, hover over “Account” and click “Installed Packages.”

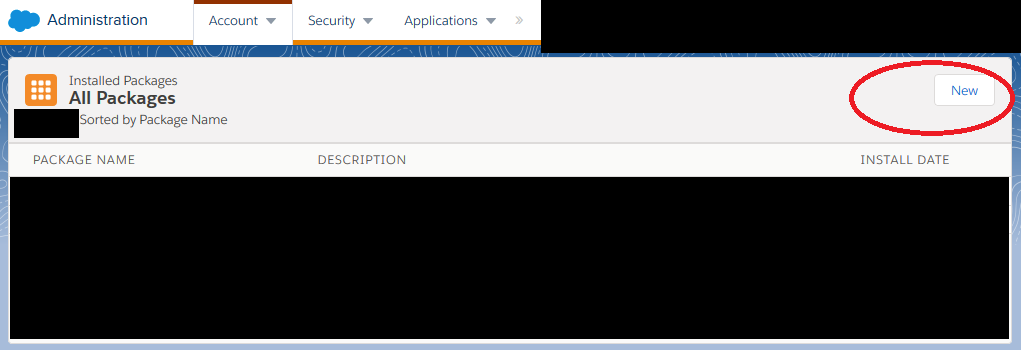
2: Create a new package
Click the “New” button.
Give your new package a name and description. Click Save.
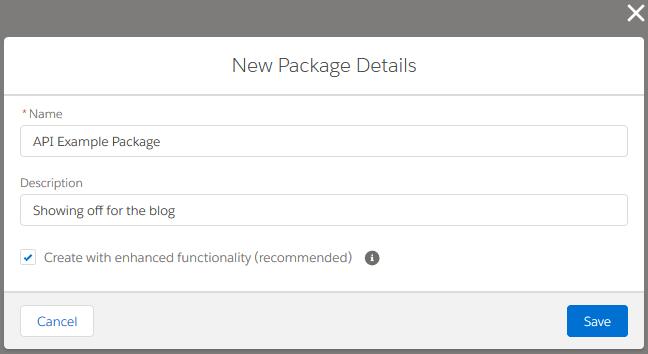
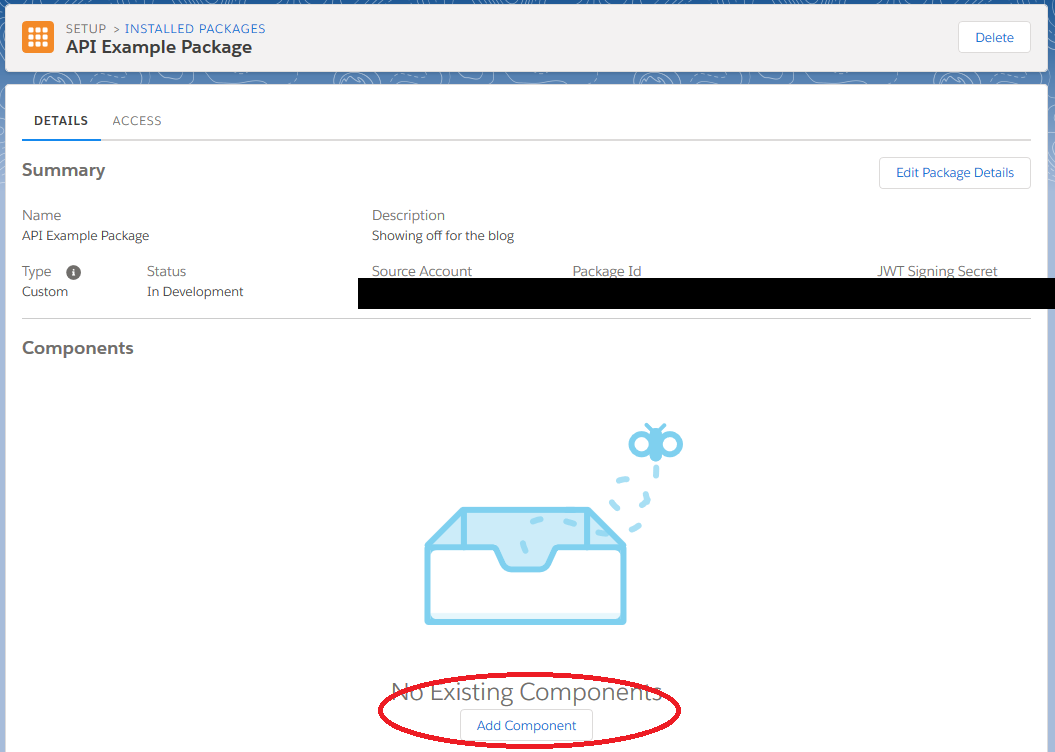
You have a new package!
In the bottom half of its “details” tab, it will indicate that your new package doesn’t yet have any components.
In just a moment, after this brief diversion, click on “Add Component.”
Diversion: access settings
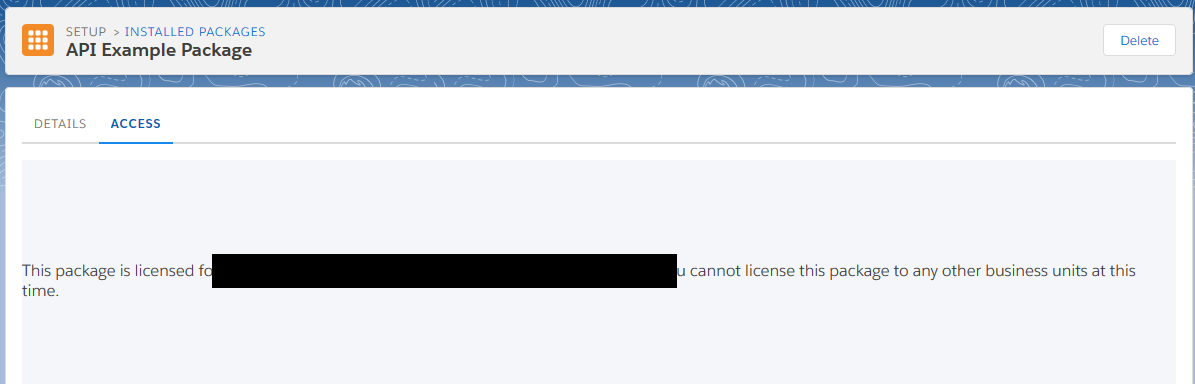
If you click on the “Access” tab of your package, you’ll notice that it’s only valid for accessing data of whatever “business unit” you were looking at when you logged into Marketing Cloud.
We’ll have a chance to fix that later.
3: Create a new component
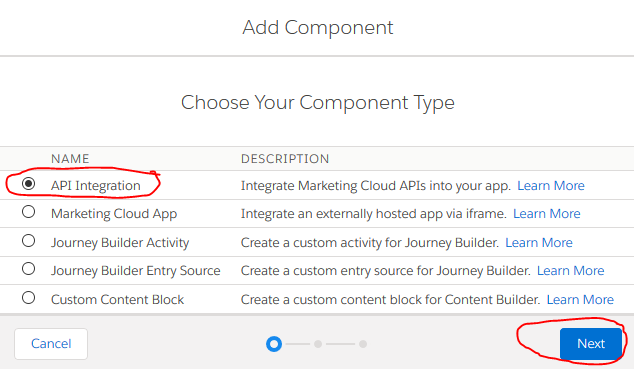
Having clicked on the “Add Component” button in the new package’s “details” tab, you’ll choose “API Integration” from the radio-button menu of options and click “Next.”
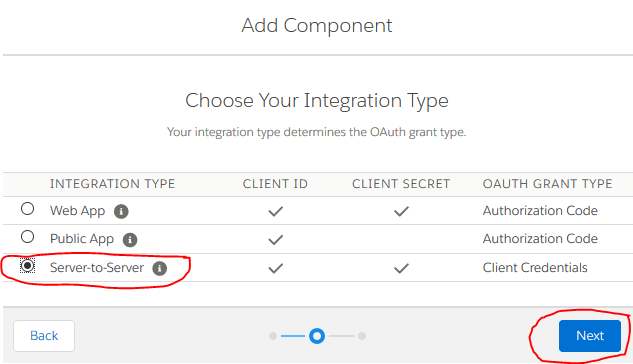
Choose “Server-to-server” from the radio-button menu of options and click “Next.”
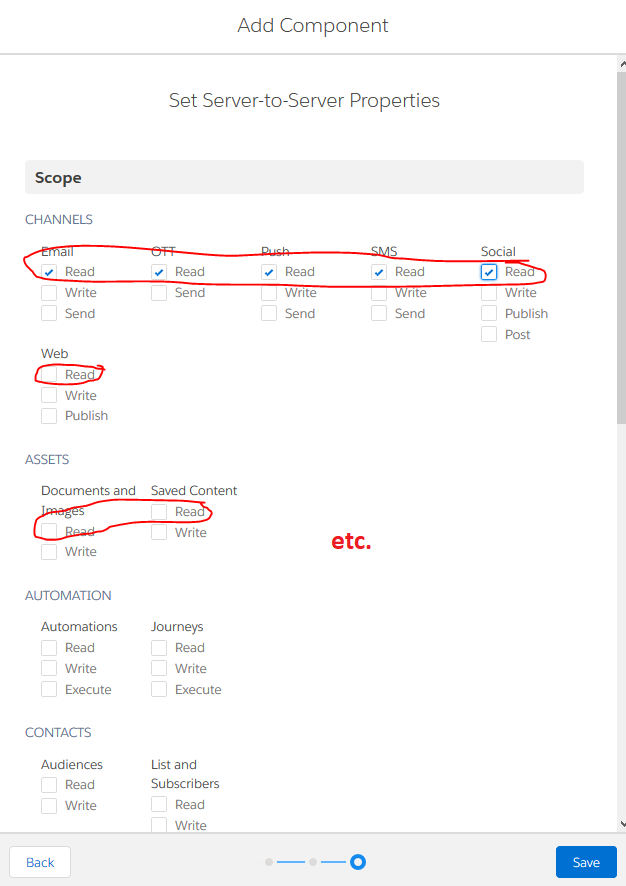
Click the “Read” checkboxes on anything you want to be able to read with code and click “Save.”
I checked “Read” in all the boxes.
IMPORTANT: Please don’t click anything but “Read” yet.
You really don’t want to be the person who erased all the data in Marketing Cloud because you gave yourself “write” permissions with an API you haven’t even tried yet, do you?
Diversion: access settings
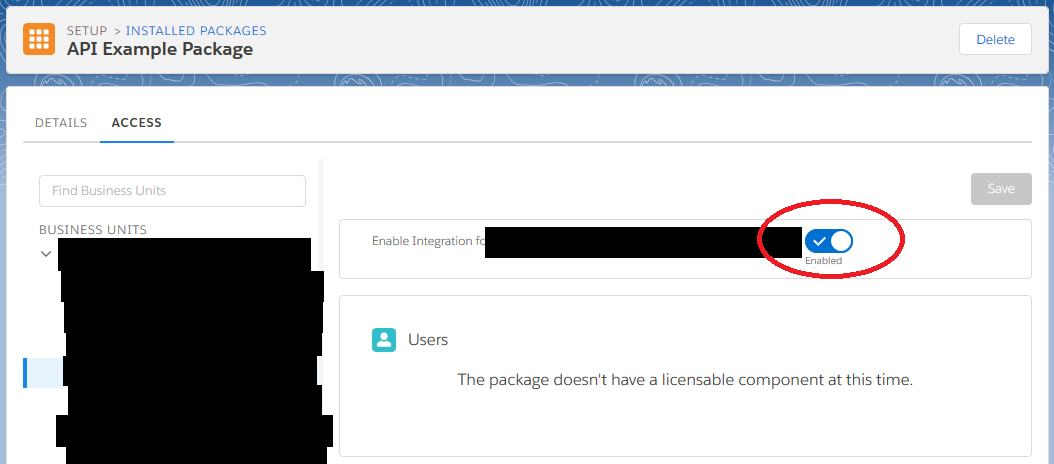
Now if you click on the “Access” tab of your package, you’ll see a left-nav listing all your “business units.”
Click on one and you can toggle API access to this BU’s data on or off.
4: Secrets -> Python -> Voilà!
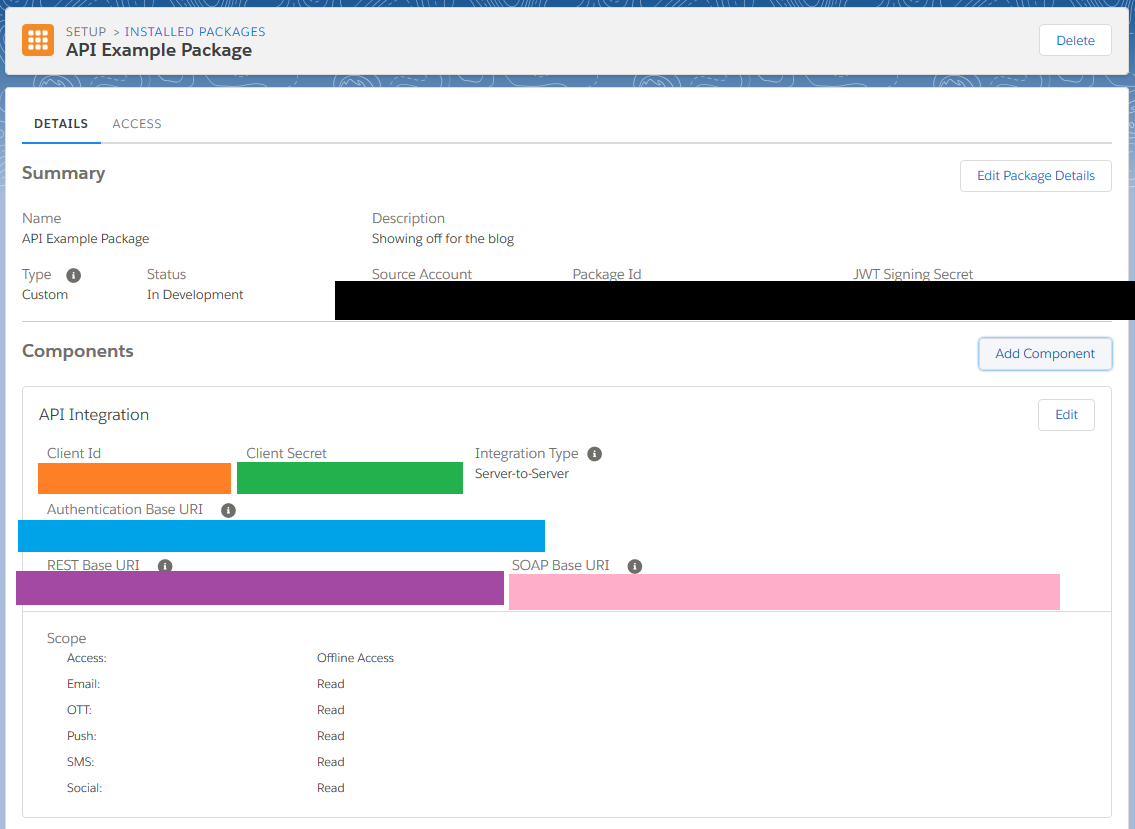
In the “Details” tab of your package, down below under “Components,” under “API Integration,” you’ll find all sorts of secret information.
3 key pieces of information are your “Client Id,” “Client Secret,” and “Authentication Base URI.”
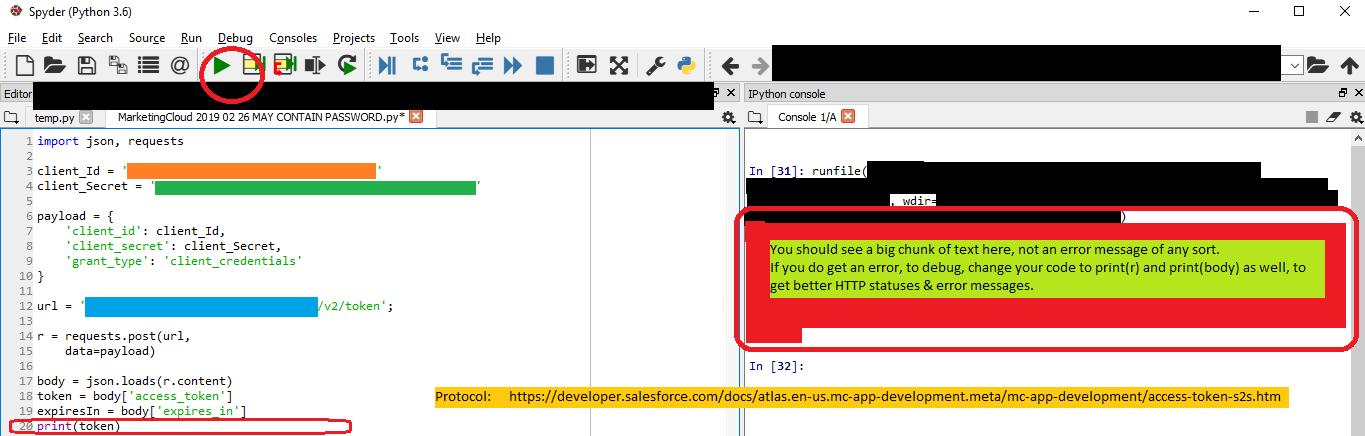
Open up an IDE from which you can execute Python and run the following script, making appropriate substitutions for “YOUR_CLIENT_ID,” “YOUR_CLIENT_SECRET,” and “https://YOUR-AUTHENTICATION-URI.com” (before the “/v2/token’ part of the URL):
import json, requests

client_Id = 'YOUR_CLIENT_ID'
client_Secret = 'YOUR_CLIENT_SECRET'

payload = {
    'client_id': client_Id,
    'client_secret': client_Secret,
    'grant_type': 'client_credentials'
}

url = 'https://YOUR-AUTHENTICATION-URI.com/v2/token';

r = requests.post(url,
    data=payload)

body = json.loads(r.content)
token = body['access_token']
expiresIn = body['expires_in']
print(token)
If everything goes well, print(token) should show you the token you just generated.
If things don’t go well, try adding print(r) and print(body) to your script and re-running. You’ll get more detailed status and error responses about the HTTPS POST request that Python just made on your behalf.
For the next 20 minutes, you’ll prove your identity by passing this “token” value to one of the other two URLs Marketing Cloud gave you (REST or SOAP).
Those URLs are for actually fetching data from Marketing Cloud.
(Note: Actually including a “content-type” of “application/json,” as per the official instructions, seems touchy. It didn’t work for me. Try taking it out of your header if you encounter problems.)
Happy experimenting!
Updates
Administrator Type Matters
Thanks to commenter Joseph Vaughan for pointing out:
There is one thing that stumped me for a while. Although I had Administrator rights in Marketing Cloud, that does not come with something called Marketing Cloud Administrator which gives you the permission needed: Install Package | Administer. Oddly, the interface lets you install the package even if you don’t have this permission, but you will get an error asking to check if client id, client secret are accurate and that the package “has been installed and enabled.”
Local MarketingCloud specialist Kyle Griffin clarifies:
- The role “Administrator” is just an “Email Studio” administrator (MarketingCloud’s first product).
- The role “MarketingCloud Administrator” lets you administer the rest of the suite.
The UI changed
MarketingCloud moved everything around since I wrote this. To get through the steps under 1: Admin -> Installed Packages:
- You click “Setup” instead of “Administration” under your name.
- Instead of clicking a top-nav “Account” to find “Installed Packages,” the navigation is at left now. Find “Installed Packages” under Platform Tools -> Apps.
A SOAP hello world with Postman
I gave an example of getting connected in Python, but if you’re new to connecting to APIs, try with Postman first.
Postman is a graphical user interface tool that makes it easy to figure out “where to put what” when making HTTP requests against APIs. When I’m experimenting, I find it much easier than doing everything with a textual programming language.
Install and open Postman on your computer. Click, in the upper left, Import. Then click the 3rd tab, “Import From Link,” and paste in https://katiekodes.com/files/MarketingCloudPostmanCollectionForBlog.json and click the Import button.
At left in Postman (go full-screen to expose it if you don’t see it), you’ll see a folder in the “Collections” tab called “Katie Kodes Marketing Cloud.”
- The item “1. LOGIN - API v2” is the Postman equivalent of the Python script I provided above.
- Double-click it to open it in a new tab at right.
- In the URL between
POSTand the Send button, changehttps://YOUR_SUBDOMAIN.auth.marketingcloudapis.com/v2/tokento the samehttps://YOUR-AUTHENTICATION-URI.com/v2/tokenI explained earlier.
(It’s the same idea, I just included a bit more of the custom-to-your-org URL that you’d see before the “.com” in my Postman example.) - In the “Body” tab of the request editor, replace
YOUR_CLIENT_IDwith your actual client ID andYOUR_CLIENT_SECRETwith your actual client secret. - Click Send and see what you get at bottom under Response.
- Not happy with your results? Click Examples (1) at the top right and click “1. LOGIN - API v2 - example response” from the picklist.
- Take a look at the example response towards the bottom of the screen. That’s what mine looked like, only with real values where
YOUR_AUTH_KEY,https://YOUR_SUBDOMAIN.soap.marketingcloudapis.com/, andhttps://YOUR_SUBDOMAIN.rest.marketingcloudapis.com/are. - At the left of the HTTP request editor window, click the leftward-pointing arrow reading “1. LOGIN - API v2.”
- The item ““2. FIRST SOAP CALL - Query All Data Extensions with V2 authentication key” is for you to try once you have a value copied to your clipboard where
YOUR_AUTH_KEYwas supposed to show up in the login response.- Double-click it to open it in a new tab at right.
- In the URL between
POSTand the Send button, change theYOUR_SUBDOMAINinhttps://YOUR_SUBDOMAIN.soap.marketingcloudapis.com/v2/tokento match the value that came back in the response to logging into MarketingCloud under “soap_instance_url.” - In the “Body” tab of the request editor, do the same between the
<a:To s:mustUnderstand="1">and</a:To>tags of the XML contained therein. - Also in the “Body” tab of the request editor, replace
YOUR_AUTH_KEYbetween the<a:fueloauth>and</a:fueloauth>tags of the - The contents of
<RetrieveRequest>…</RetrieveRequest>are where you tell MarketingCloud what kind of data you want. Here, I chose to download all my Data Extensions and to get the following information about each one in the download:ObjectID,CustomerKey,Name,IsSendable, andSendableSubscriberField.Name. Hopefully you have Data Extensions, too, or the results of this “Hello World” might be a little underwhelming! - Click Send and see what you get at bottom under Response.
- Not happy with your results? Click Examples (1) at the top right and click “2. FIRST SOAP CALL - Query All Data Extensions with V2 authentication key - example response” from the picklist.
- Take a look at the example response towards the bottom of the screen. That’s what mine looked like, only I had dozens of real data extensions instead of 3 fake ones.
- At the left of the HTTP request editor window, click the leftward-pointing arrow reading “2. FIRST SOAP CALL - Query All Data Extensions with V2 authentication key.”
Once you’re up and running and ready for more, check out Anthony Dotson and team’s great Github repository “SFMC-Postman.”
That repository has a Postman “collection,” like mine, that you can import into Postman and try lots of examples from once you’ve gotten a first “fetch all your data extensions” hello-world going.
Pull apart the bodies of the various request examples and see how they say the same vs. how they vary.
Note that the XML-formatted text of the body of many of these requests is known as a “SOAP message” or “SOAP envelope.” For the most part, every HTTP request to MarketingCloud’s “SOAP” API will look the same … it’s just little pieces of this blob of text that are going to vary. But you have to get them just right or things fail. Honestly, I still haven’t gotten more than 6 examples from the GitHub repo working yet (although I haven’t had to).
Good luck, and share what you build!
