Setting up Python on Windows with Miniconda by Anaconda
04 Mar 2019
Table of Contents
After documenting this process step-by-step, I’ve concluded that the best way to install Python on your computer is to follow these shorter instructions and simply:
Download & install software called “Anaconda”. Look for software called “Spyder” in your Start menu, run it, and start coding.
You’ll be much happier than you would following these instructions, which take you through installing “Miniconda” (made by the makers of Anaconda) and adding functionality like “Spyder” and “Pandas” by hand.
But Miniconda takes less space, and may be easier to install without admin rights to your computer, so it’s worth documenting step-by-step.
Plus, even if you install “big Anaconda,” as I like to call it, the instructions on installing & updating “modules” in this documentation may come in handy if you need to install extra modules like “Simple Salesforce” or if you want to update your Python installation in a year.
(Alternatively, I wrote a tutorial on installing the Windows Store version of Python.)
Intro
Chris Moffitt, author of Practical Business Python, recently said on episode 200 of the “Talk Python To Me” podcast that he likes to walk beginners through installing Anaconda’s “Miniconda” software on their system and adding Excel-friendly plugins like “pandas” by hand.
(If your computer will let you, though, consider installing the main, big version of Anaconda software – it’s so much simpler!)
Still, I respect Chris’s experience, so let’s give it a try!
I’ll be screenshotting the process of getting up and running on a Windows 64-bit machine.
Note: This tutorial is aimed at non-programmers who just want to edit a few CSV files with Python. If you’re a serious data scientist, learn the nuts and bolts of Anaconda at Real Python’s “Setting Up Python for Machine Learning on Windows”
Did you get Miniconda and Spyder installed?
Yay! I’m thrilled I could help.
If you’d like, I’d love a Ko-Fi. (Chai for me!) 🥰

Installing Miniconda & running a Python program
Download
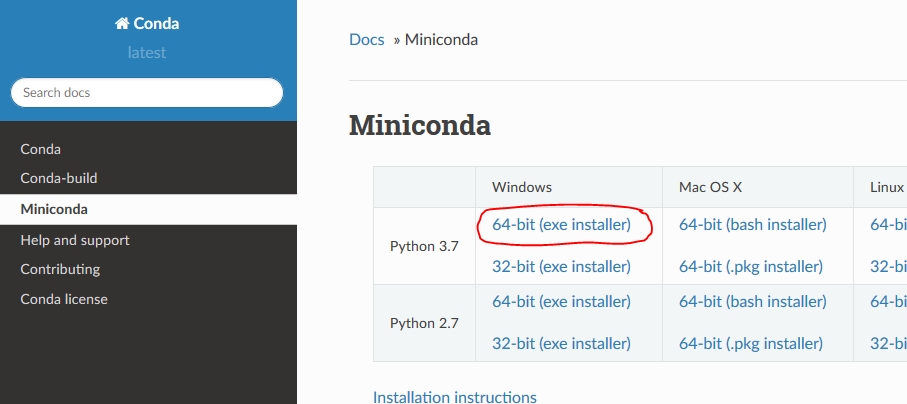
First, download Miniconda from Anaconda, Inc. You want one for “Python 3.something,” not “Python 2.something.”
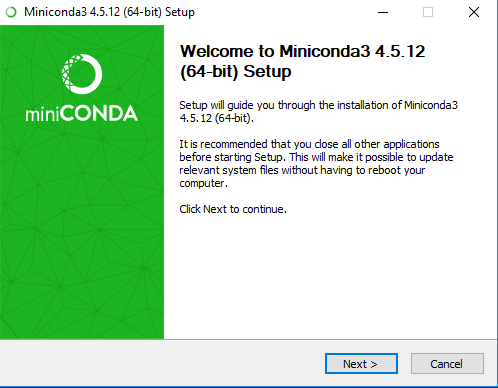
Run the Miniconda installer
Double-click the “.exe” file to run setup. Click “Next,” then click “I Agree” on the following screen.
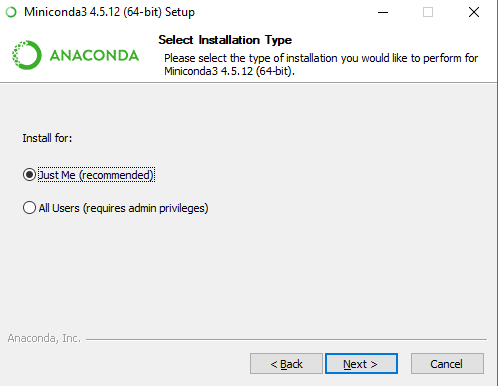
Choose “just me” or “all users”
I’m going to install this for “just me,” because I don’t have admin rights to install software on my corporate PC.
My choice here influences whether the installer suggests installing the program under:
C:\Users\MY_USERNAME\AppData\Local\Continuum\miniconda3(just me), orC:\ProgramData\Miniconda3(all users)
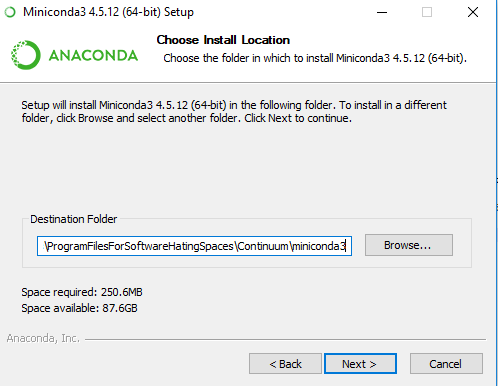
Installation folder
It bothers me to forget when software is installed in my \AppData\Local\ hidden folders, so I am going to manually change the installation path on the next screen to C:\Users\MY_USERNAME\Documents\ProgramFilesForSoftwareHatingSpaces\Continuum\miniconda3.
(Also, I already have another copy of Anaconda on my system, and I think I might have let it install there, and I don’t want to mess it up while writing this blog post.)
Yes, I called that folder “ProgramFilesForSoftwareHatingSpaces” – I was feeling a bit pouty when Anaconda complained about my “Program Files” folder I’d set up under “My Documents.”
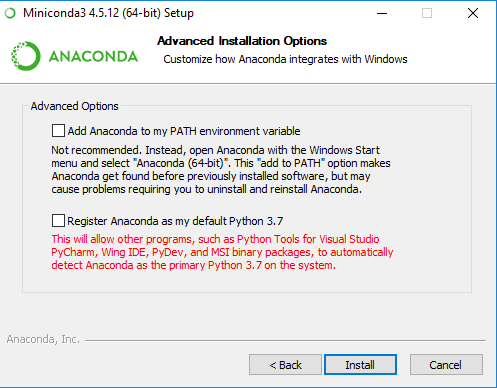
Options
Next, the installer is going to ask me whether I want to do either of two things.
- Add “Anaconda” to my “PATH” environment variable. It says not to do it right in the installer text, so I’m going to leave it un-checked.
- Register “Anaconda” as my “default Python 3.7” environment. This comes checked, and they recommend it, but I already have Python installed elsewhere on my computer. I’m just installing this to blog about it. So I am going to un-check it. You will probably want to leave it checked.
Now I’ll click “Install.”
While it runs
The installer takes a few minutes while it dumps thousands of small files onto your hard drive.
Q: Why so many files?
A: Your computer doesn’t naturally understand Python commands.
At a really low level, it understand commands in its “assembly language” (which you wouldn’t want to have to write by hand).
All Windows computers are shipped understanding a language called “C” (which, if you don’t want to become a professional programmer, you probably still wouldn’t want to have to write by hand).
Lots of support programs written in “C” teach your Windows computer how to understand commands written in “Python” (presuming you, or a program like an “IDE” acting on your behalf, tell Windows where exactly you installed your software that can help parse these commands – for me, that would be C:\Users\MY_USERNAME\Documents\ProgramFilesForSoftwareHatingSpaces\Continuum\miniconda3\python.exe).

Finishing
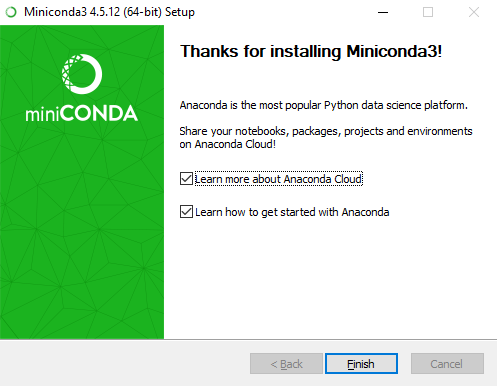
When it says “Completed”, click “Next.”
Leave the “learn more” boxes checked, or un-check them, as you prefer, and click “Finish.”
(The second checkbox brings you here; the first just brings you to Anaconda’s website.)
Finding Python
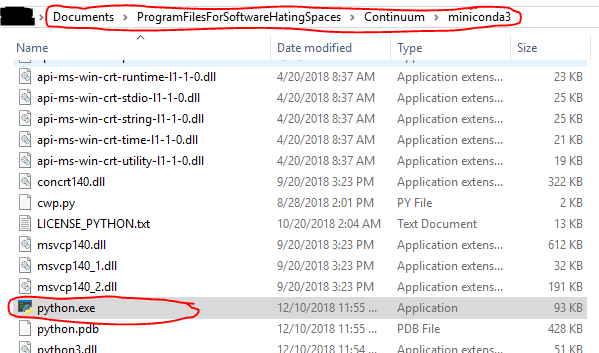
If you navigate to the directory where you chose to install “miniconda” (for me, C:\Users\MY_USERNAME\Documents\ProgramFilesForSoftwareHatingSpaces\Continuum\miniconda3\), you’ll see a bunch of files.
The important to know about, though, is:
python.exe
You won’t ever double-click this and run it directly as an end user, but any time you want to run Python code you’ve written, you’ll need to tell your computer about the existence of this file. It’s the program that helps your computer understand how to execute Python commands.
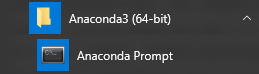
If you look at your “Start” menu (the thing that pops up when you click the Windows icon in the bottom left corner of your screen), you may also notice a new folder called “Anaconda3 (64-bit)” with an icon beneath it called “Anaconda Prompt.”
Side-note: if you’re like me and already had big-Anaconda installed, all your other Anaconda shortcuts will have stayed as they were, and the contents of the “Anaconda Prompt” shortcut will have changed to be as follows:
%windir%\System32\cmd.exe "/K" C:\Users\MY_USERNAME\Documents\ProgramFilesForSoftwareHatingSpaces\Continuum\miniconda3\Scripts\activate.bat C:\Users\MY_USERNAME\Documents\ProgramFilesForSoftwareHatingSpaces\Continuum\miniconda3
To fix it, find “Anaconda Prompt” in C:\Users\MY_USERNAME\AppData\Roaming\Microsoft\Windows\Start Menu\Programs\Anaconda3 (64-bit), right-click “Properties,” and alter the “Target” from the text above so that it points to your old Anaconda installation.
For me, that meant replacing every occurrence of \Documents\ProgramFilesForSoftwareHatingSpaces\Continuum\miniconda3\ with \AppData\Local\Continuum\anaconda3\.
Of course, I’m not going to do that until I finish writing this blog post, because at the moment, I want to screenshot myself using the “miniconda” “Anaconda Prompt” to install modules like Pandas!
Hello World: running a Python program
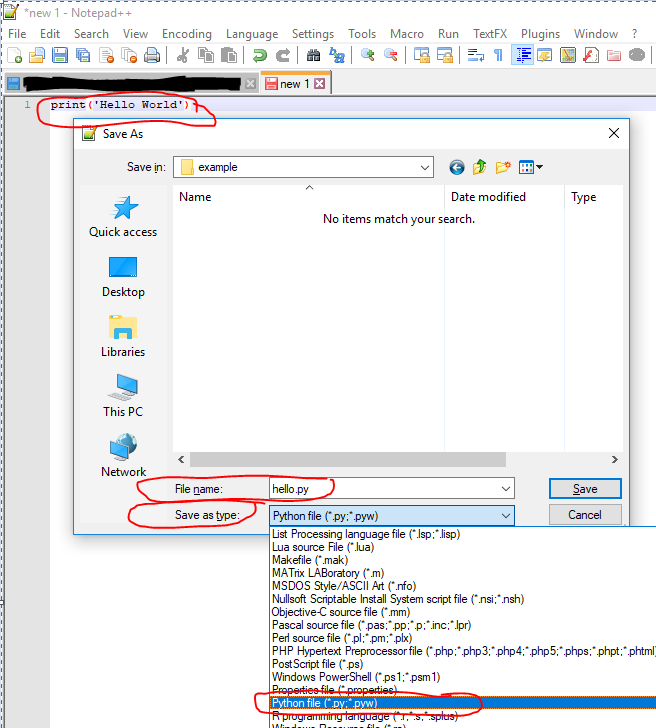
Open up a nice text editor like Notepad++.
Create a new file. In it, type the following text, using the apostrophe key on your keyboard for the single quotes:
print('Hello World')
Do “File -> Save As.”
Pick a nice folder for your program (personally, I’m going to save mine under C:\example\, but you might want to put it on your desktop) and save it there with a filename of “hello.py,” being sure to change the “Save as type” option to “Python file” or to “All Types (.).”
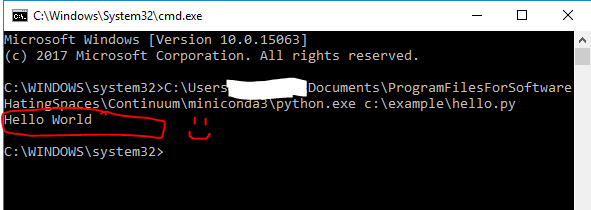
Once you’ve done that, open a “command-line prompt” by hitting the Windows key on your keyboard, typing “cmd,” and hitting “enter.”
![]()
At the prompt, type something along the following lines, only changing the file paths to be where your “python.exe” lives and where your “hello.py” lives, and hit your enter key:
C:\Users\MY_USERNAME\Documents\ProgramFilesForSoftwareHatingSpaces\Continuum\miniconda3\python.exe c:\example\hello.py
If it works, on the following line, you’ll see the text, “Hello World.” Go you! You just wrote a program in Python and executed it!
Let’s go on a tangent and try one more command. It should fail, because without us explicitly telling Windows where “python.exe” lives, it doesn’t know (there are ways to do that by adding it to a system “environment variable” named “PATH,” but we haven’t, so it should fail):
python c:\example\hello.py

You can now close the command-prompt window. Type “exit” and hit enter, or just click the “X” in the upper-right-hand corner.
I’d like to show you one more “geeky” way of running your program. Remember that new “Anaconda Prompt” icon that appeared under the new “Anaconda3 (64-bit)” in your Windows “Start Menu”? Run it.
You’ll get a command prompt that looks like this:
![]()
Now, try running the command that previously failed in this command prompt:
python c:\example\hello.py
You should see “Hello World” right below your command.

Q: Why did it succeed? A: Because the “Anaconda Prompt” knows more about your Python installation than the general-purpose “Windows” command-line prompt does!
Leave the “Anaconda Prompt” open – we’re going to keep using it for a bit longer.
IDEs
Setting up an IDE for pleasant programming
That wasn’t a particularly fun way to code, was it?
If you’ve practiced coding in an online “IDE” like Repl.it or CodeBunk, you know that coding can be as easy as clicking a big “run” button every time you type enough text that you wonder what it does.
To get the same experience, we need to install an “IDE” on our PC.
A popular one is Spyder.
When you install the full version of Anaconda, it installs Spyder for you.
However, Miniconda doesn’t seem to come with Spyder.
Fortunately, Miniconda does make it easy to install.
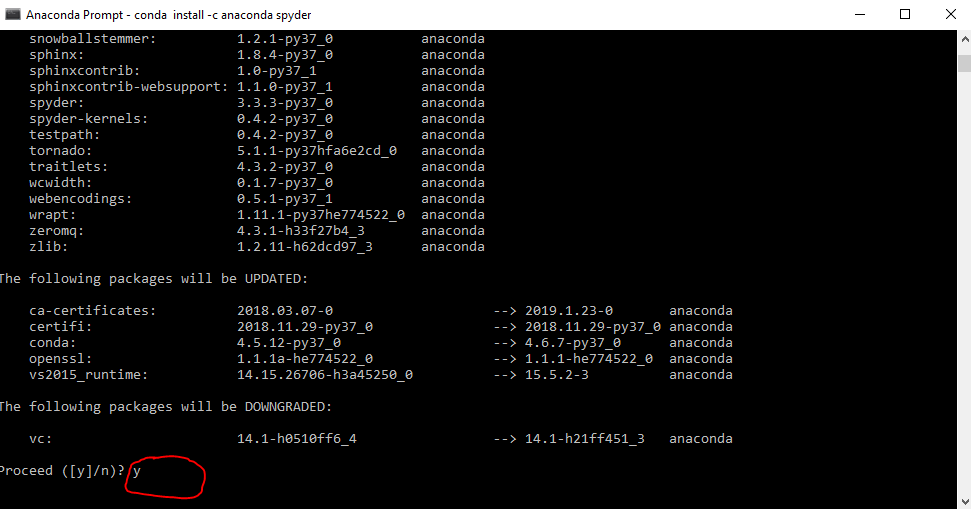
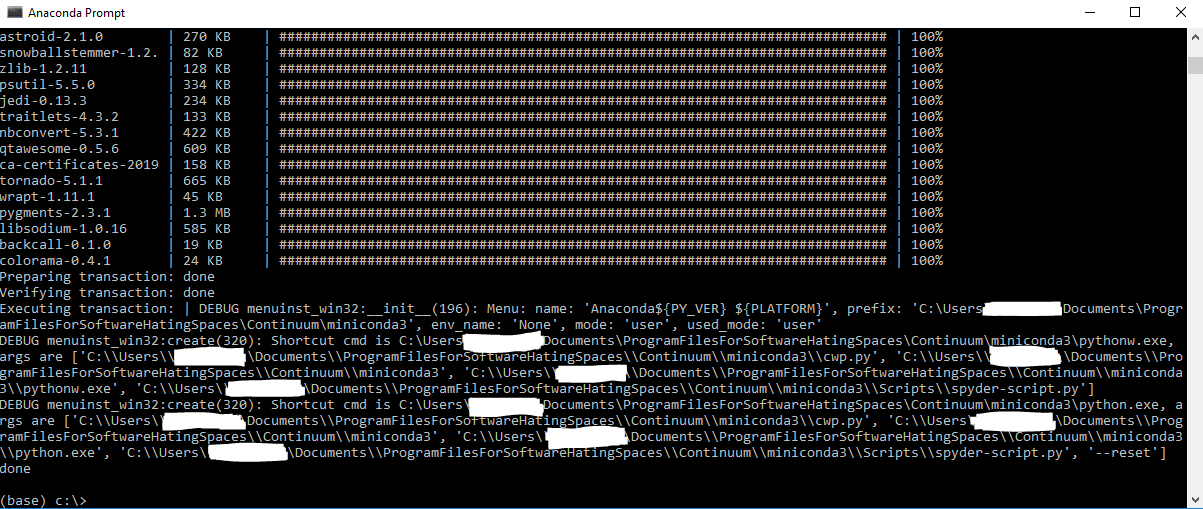
In our “Anaconda Prompt,” we’ll execute the following command by typing it and pressing the “enter” key:
conda install -c anaconda spyder
After thinking a bit, the command prompt prepared a bunch of files to download and asked if I’d like to proceed. I’m not sure exactly why a certain package called “vc” on my hard drive is about to get downgraded … maybe my other “big Anaconda” installation had a newer version … I may have some cleanup to do after writing this blog post.
Anyway, I’ll go ahead and type “y” and hit “enter” to proceed.
It takes a while. Unlike installing normal Windows files, the download and installation all happens as text scrolling by my command-prompt screen, not as a friendly gray box in the middle of my screen with “Next” and “Finish” buttons.
Spyder is, technically, just a big Python program itself … hence lots of Python “packages”/”modules” needing to be downloaded & installed to my computer to get it to run.
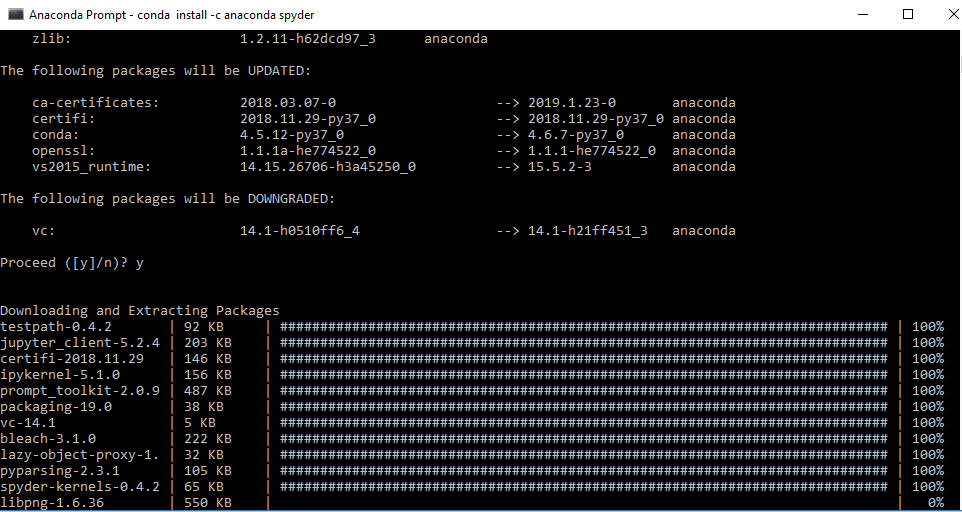
When it’s all done, I get a dump of way too much information, but at the end, it says “done” and there’s nothing that says the word “error,” so that seems good.
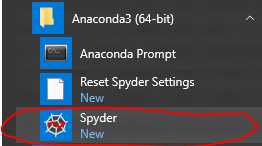
If you look at your “Start” menu, in the “Anaconda3 (64-bit)” folder, you should notice a new “Spyder” icon.
I like to right-click it and click “Pin to Start Menu.” But I use Spyder a lot!
Side-note: if you’re like me and already had big-Anaconda installed, yup, your start menu got overwritten again. Grrrr.
Frustratingly, if you go to C:\Users\MY_USERNAME\AppData\Roaming\Microsoft\Windows\Start Menu\Programs\Anaconda3 (64-bit) and right-click “Properties” of “Spyder,” the “Target” is so long it’s cut off. I get as far as…
C:\Users\MY_USERNAME\Documents\ProgramFilesForSoftwareHatingSpaces\Continuum\miniconda3\pythonw.exe C:\Users\MY_USERNAME\Documents\ProgramFilesForSoftwareHatingSpaces\Continuum\miniconda3\cwp.py C:\Users\MY_USERNAME\Documents\ProgramFilesForSoftwareHatingSpaces\Continuum\miniconda3 C:\Users\MY_USERNAME\Documents\ProgramFilesForSoftwareHatingSpaces\Continuum\miniconda3\pythonw.exe C:\Users\MY_USERNAME\Do
Based on the dump from when I finished installing Spyder for “Miniconda,” the “target” I’m going to want in my Start Menu for “Spyder” will be:
C:\Users\MY_USERNAME\AppData\Local\Continuum\anaconda3\pythonw.exe C:\Users\MY_USERNAME\AppData\Local\Continuum\anaconda3\cwp.py C:\Users\MY_USERNAME\AppData\Local\Continuum\anaconda3', 'C:\Users\MY_USERNAME\AppData\Local\Continuum\anaconda3\pythonw.exe C:\Users\MY_USERNAME\AppData\Local\Continuum\anaconda3\Scripts\spyder-script.py'
And for “Reset Spyder Settings” it seems it’ll probably be the same thing plus “ --reset”:
C:\Users\MY_USERNAME\AppData\Local\Continuum\anaconda3\pythonw.exe C:\Users\MY_USERNAME\AppData\Local\Continuum\anaconda3\cwp.py C:\Users\MY_USERNAME\AppData\Local\Continuum\anaconda3', 'C:\Users\MY_USERNAME\AppData\Local\Continuum\anaconda3\pythonw.exe C:\Users\MY_USERNAME\AppData\Local\Continuum\anaconda3\Scripts\spyder-script.py'
I guess I’ll find out when I try to clean up this mess after I finish the blog post! The sacrifices we make in the name of science…
Using our IDE to program
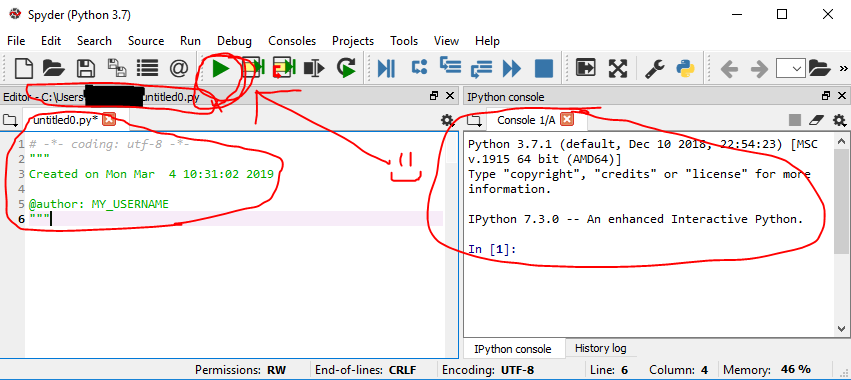
Now that you have Spyder installed, run it (click it on the Start menu).
The splash screen while it starts up looks like this:

And in your taskbar, once it’s up and running, its icon looks like this:

When it’s fully open, it’ll typically look something like this:
- On the left will be a place for you to edit code, with a new file called “untitled.py” (tentatively proposing you save it in
C:\users\YOUR_USERNAME\untitled0.py) whose contents are:
# -*- coding: utf-8 -*-
"""
Created on SOME_TIMESTAMP

@author: YOUR_USERNAME
"""
On the right, or at the bottom right, will be some sort of “console” where you can watch code execute every time you hit the big green “run” button near the top of the screen (it’s a right-facing green triangle).
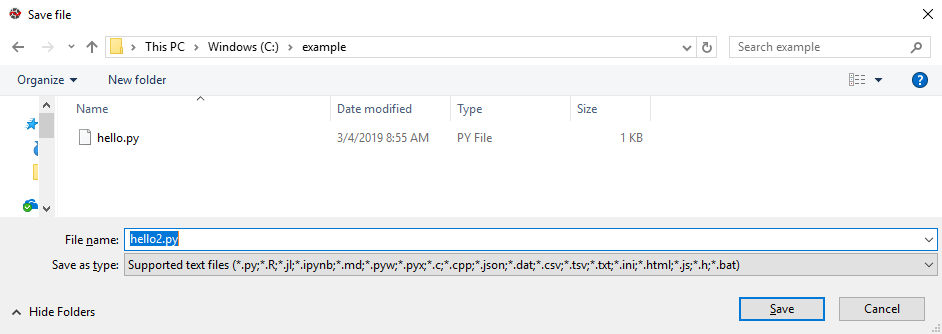
In the top menu, click “File” -> “Save As.”
Navigate to whatever folder you saved “hello.py” in and save this one in the same folder, only call it “hello2.py.”
(Spyder’s “run” button complains if you try to run code before giving it a proper spot on your hard drive. You could just do file->save, but I personally can’t stand cluttering my c:\users\MY_USERNAME\ with files like “untitled0.”)
Now erase the entire contents of the file, and on line 1, type:
print('Hello again')
Then click the big green “run” button.
You may see a pop-up dialog with all sorts of options about executing code consoles or interpreters and such.
Just click “cancel” on the pop-up dialog box and then click the play button again.
The pop-up box was giving you a chance to highly customize where you want to see any output from running your code.
Clicking “cancel” and trying again seems to tell Spyder, “you figure out where to display the output of this code, don’t bother me with all these options.”
(Unfortunately, I didn’t catch this dialog box with a screenshot – Spyder seemed to remember my settings from my previous usage of it with “big Anaconda.”)
Your output should look something like this – somewhere at the right-hand side of the screen, probably in a console called “Console 1/A,” you’ll see confirmation of the filepath of “hello2.py,” followed by a new line with the text
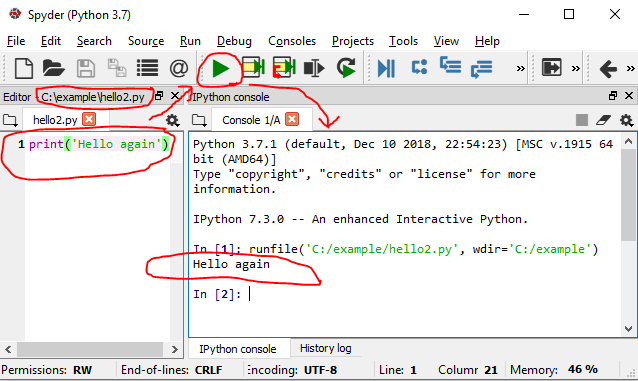
Congratulations – you’ve set up Spyder and you’re almost ready to write bigger programs!
In the top menu, click “File” -> “Save” because why not be proud of this working code? It’s good to get used to saving your work as soon as you like it.
Modules
Checking whether “modules” are installed
Now you need to learn what it looks like when a given extension to the Python language, also known as a “library” or “package” or, particularly in Python, a “module,” is installed.
Backspace out the entirety of your code and on line 1, type:
import pandas
Click the “run” button.
If you get a huge dump of colorful text in your console, with the last few lines of the big error message saying the following, you now know that you don’t have the module called “pandas” installed:
    exec(compile(f.read(), filename, 'exec'), namespace)

  File "C:/example/hello2.py", line 1, in <module>
    import pandas

ModuleNotFoundError: No module named 'pandas'
If you do have “pandas” installed, nothing special happens.
If you have “pandas” installed, when you run this code, you just get a command prompt (“In[SomeNumber]”) in the box at the right where the number in square brackets is 1 bigger than it was before.
Let’s fix that and install Pandas so our code runs.
Installing a “module”
When using Anaconda/Miniconda, it’s always best to use the “conda installer” than the “pip installer,” using the “pip installer” only when the “conda installer” can’t find a module you want on your computer.
Both “installers” are just command-line programs that work in the “Anaconda Prompt” and go out and and download things from the internet and install them on your computer for you.
Just like happened when we installed Spyder.
If you already closed the “Anaconda Prompt” command-line interface, open it again.
Type the following and hit “enter” to execute:
conda install pandas
I received a prompt confirming whether I really wanted to install it. I typed “y” and hit “enter” to proceed.
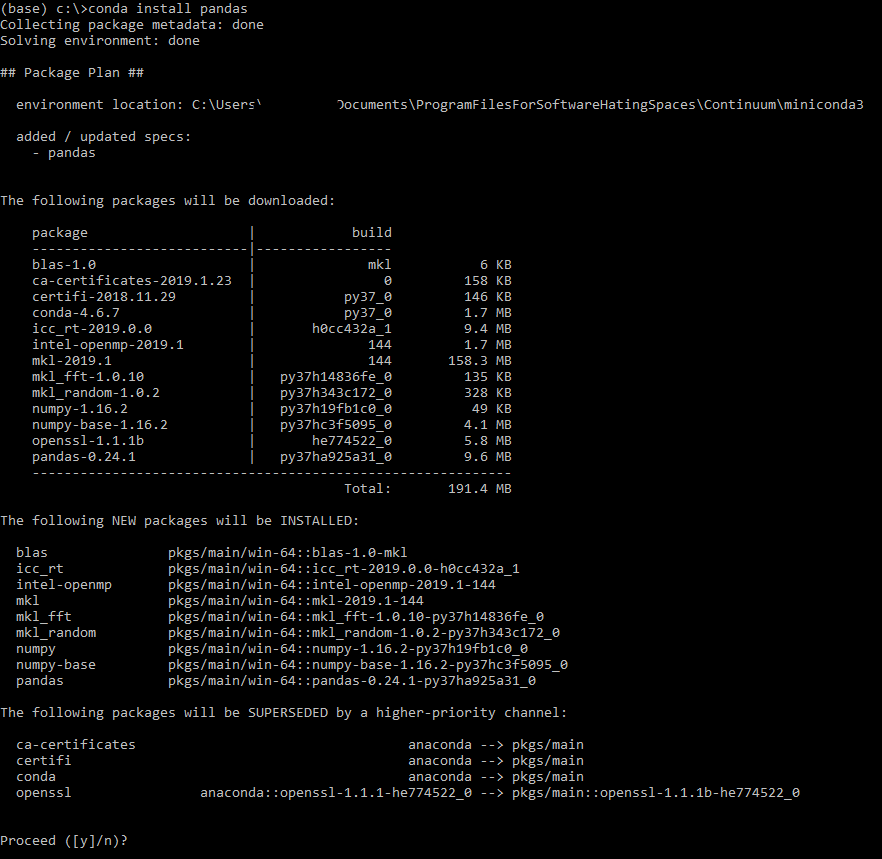
You may notice that it downloaded a lot more than just “pandas.” There’s another package that’s highly intertwined with “pandas” called “numpy” that it’s going to download for us … we’ll check after we’re all done that it installed, too.
The download and install takes a few minutes.
Yay: all done!

Add a 2nd line of code to your program at left and click “Run” again, with the full code being:
import pandas
import numpy
Now you should get the boring “nothing happens except the command prompt incrementing” thing.
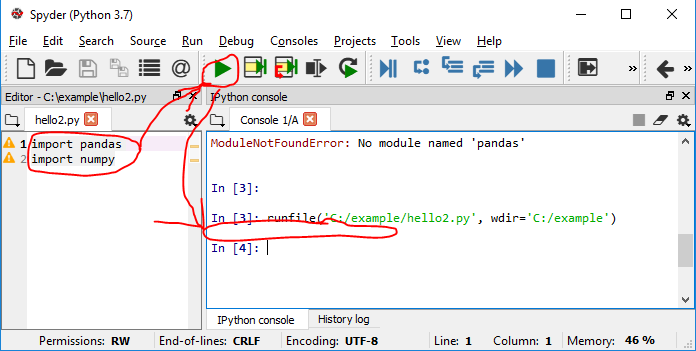
Trivia: the orange warning triangles to the left of the line numbers are telling us that we “imported” packages our code doesn’t actually use. It’s trying to help us write better, more efficient code.
Red circles with “x” in them to the left of the line numbers means a line doesn’t even contain legitimate Python to begin with.
Updating a “module”
Has it been a year, and you’ve heard there are newer & greater versions of Pandas?
Just open up the “Anaconda Prompt” and run the following command:
conda update pandas
Similarly, to update your version of Python itself, run:
conda upgrade -c anaconda python
After doing so, you might want to get the latest copies of all your modules for good measure:
conda update --all
Installing a “module” Conda doesn’t know about
Change your whole Python program to be the following code and run it:
import simple_salesforce
Oh, darn it. We don’t have Simple Salesforce installed, a Python module that makes it easier to download and update data in a Salesforce database.
We can tell we don’t have it because of our error-message dump ending with “ModuleNotFoundError: No module named 'simple_salesforce'.”
(Hint: the useful part of any huge error message dump is usually at the beginning or the end!)
Let’s go download Simple Salesforce.
Note: in “installers,” it’s “simple-salesforce” with a hyphen. When doing an “import” in Python code, it’s an underscore. Not sure why … that’s just how the author packaged it up.
Try this in the “Anaconda Prompt”:
conda install simple-salesforce
You’ll get an error like this:
Collecting package metadata: done
Solving environment: failed

PackagesNotFoundError: The following packages are not available from current channels:

  - simple-salesforce

Current channels:

  - https://repo.anaconda.com/pkgs/main/win-64
  - https://repo.anaconda.com/pkgs/main/noarch
  - https://repo.anaconda.com/pkgs/free/win-64
  - https://repo.anaconda.com/pkgs/free/noarch
  - https://repo.anaconda.com/pkgs/r/win-64
  - https://repo.anaconda.com/pkgs/r/noarch
  - https://repo.anaconda.com/pkgs/msys2/win-64
  - https://repo.anaconda.com/pkgs/msys2/noarch

To search for alternate channels that may provide the conda package you're
looking for, navigate to

    https://anaconda.org

and use the search bar at the top of the page.
Now try the pip installer instead of the “conda installer” by running this command:
pip install simple-salesforce
The output will look something like this:
Collecting simple-salesforce
  Using cached https://files.pythonhosted.org/packages/ad/59/c63fed8dcbfe91d398321d8d8f28c0a3660f861c8d5c57361af65ad13615/simple_salesforce-0.74.2-py2.py3-none-any.whl
Requirement already satisfied: requests[security] in c:\users\MY_USERNAME\documents\programfilesforsoftwarehatingspaces\continuum\miniconda3\lib\site-packages (from simple-salesforce) (2.21.0)
Requirement already satisfied: chardet<3.1.0,>=3.0.2 in c:\users\MY_USERNAME\documents\programfilesforsoftwarehatingspaces\continuum\miniconda3\lib\site-packages (from requests[security]->simple-salesforce) (3.0.4)
Requirement already satisfied: idna<2.9,>=2.5 in c:\users\MY_USERNAME\documents\programfilesforsoftwarehatingspaces\continuum\miniconda3\lib\site-packages (from requests[security]->simple-salesforce) (2.8)
Requirement already satisfied: certifi>=2017.4.17 in c:\users\MY_USERNAME\documents\programfilesforsoftwarehatingspaces\continuum\miniconda3\lib\site-packages (from requests[security]->simple-salesforce) (2018.11.29)
Requirement already satisfied: urllib3<1.25,>=1.21.1 in c:\users\MY_USERNAME\documents\programfilesforsoftwarehatingspaces\continuum\miniconda3\lib\site-packages (from requests[security]->simple-salesforce) (1.24.1)
Requirement already satisfied: cryptography>=1.3.4; extra == "security" in c:\users\MY_USERNAME\documents\programfilesforsoftwarehatingspaces\continuum\miniconda3\lib\site-packages (from requests[security]->simple-salesforce) (2.4.2)
Requirement already satisfied: pyOpenSSL>=0.14; extra == "security" in c:\users\MY_USERNAME\documents\programfilesforsoftwarehatingspaces\continuum\miniconda3\lib\site-packages (from requests[security]->simple-salesforce) (18.0.0)
Requirement already satisfied: cffi!=1.11.3,>=1.7 in c:\users\MY_USERNAME\documents\programfilesforsoftwarehatingspaces\continuum\miniconda3\lib\site-packages (from cryptography>=1.3.4; extra == "security"->requests[security]->simple-salesforce) (1.11.5)
Requirement already satisfied: six>=1.4.1 in c:\users\MY_USERNAME\documents\programfilesforsoftwarehatingspaces\continuum\miniconda3\lib\site-packages (from cryptography>=1.3.4; extra == "security"->requests[security]->simple-salesforce) (1.12.0)
Requirement already satisfied: asn1crypto>=0.21.0 in c:\users\MY_USERNAME\documents\programfilesforsoftwarehatingspaces\continuum\miniconda3\lib\site-packages (from cryptography>=1.3.4; extra == "security"->requests[security]->simple-salesforce) (0.24.0)
Requirement already satisfied: pycparser in c:\users\MY_USERNAME\documents\programfilesforsoftwarehatingspaces\continuum\miniconda3\lib\site-packages (from cffi!=1.11.3,>=1.7->cryptography>=1.3.4; extra == "security"->requests[security]->simple-salesforce) (2.19)
Installing collected packages: simple-salesforce
Successfully installed simple-salesforce-0.74.2
Now run your Python program again – you should get a “clean” run that simply increments the command prompt.
import simple_salesforce
If so, you’ve installed the “simple Salesforce” module!
Updating a “module” Conda doesn’t know about
Again, when working with Anaconda/Miniconda, you want to upgrade your modules using the conda installer if you can.
So give this a try in the “Anaconda Prompt” command-line interface:
conda update simple-salesforce
Because you didn’t install Simple Salesforce with the “conda installer” in the first place, you’ll get this error:
PackageNotInstalledError: Package is not installed in prefix.
  prefix: C:\Users\MY_USERNAME\Documents\ProgramFilesForSoftwareHatingSpaces\Continuum\miniconda3
  package name: simple-salesforce
Now we know it’s safe to go ahead & upgrade it with the “pip installer” as follows, using the “Anaconda Prompt” command-line interface:
pip install simple-salesforce --upgrade
Happy Programming
You now have a working environment for editing CSV files in Python!
- You have an “IDE,” or as I like to think of it, a “text editor with a run button,” called Spyder, that runs code you type into it as you see fit.
- You know how to install & update “modules” that you hear might be useful.
(Be careful and don’t trust any old module you find on the internet. It’s nothing more than “custom code that you’re running on your computer. Make sure it’s not from someone sketchy. Big names likepandasare fine, though.)
Door Prize
Here’s a “door prize script” to get you started: try copying & pasting it into Spyder and running it.
import pandas
pandas.set_option('expand_frame_repr', False)
filepath = 'https://raw.githubusercontent.com/pypancsv/pypancsv/master/docs/_data/sample1.csv'
df = pandas.read_csv(filepath)
print(df)
You should see the following output in your console at right:
      Id    First      Last           Email                      Company
0   5829    Jimmy    Buffet  [email protected]                          RCA
1   2894  Shirley  Chisholm  [email protected]       United States Congress
2    294  Marilyn    Monroe  [email protected]                          Fox
3  30829    Cesar    Chavez  [email protected]          United Farm Workers
4    827  Vandana     Shiva  [email protected]                     Navdanya
5   9284   Andrea     Smith  [email protected]     University of California
6    724   Albert    Howard  [email protected]  Imperial College of Science
Now you’ve opened a CSV spreadsheet file with Python – you’re off to the races! Head here to learn new skills and put them in action on your computer.
