Compare Flow versions in VSCode for Salesforce
16 Sep 2022
Today I had to propose quickly hotfixing a Flow in production. It was terrifying – it’s production! I don’t work in Flow all the time!
Not only did I send screenshots to the org’s admins of my inactive-but-newer version … I needed to be really confident and proofread the difference between the underlying XML codebase between the two versions before I could swear I’d done the right thing.
So here’s what I did:
Prepare my computer
- I installed VSCode onto my computer.
- I installed the SFDX CLI onto my computer.
- I logged the SFDX CLI into my production org under an alias “
prodorg.” - I created a new folder on my computer called
C:\misc\. - Inside of it, I added the following file
C:\misc\sfdx-project.json:{ "packageDirectories": [ { "path": "force-app", "default": true } ], "namespace": null } - I created a new folder
C:\misc\force-app\, even though I didn’t put anything in it, lest Salesforce complain:Error (1): The path “force-app”, specified in sfdx-project.json, does not exist. Be sure this directory is included in your project root.
Download flow version 1
Version 1 was the active version, but still, it’s older, so I had to specify “-1” when downloading it.
In a Terminal prompt of VSCode that was running in a C:\misc> folder context, I ran the following command a copy of version 1 of a flow called “The_Flow_Name:”
sf retrieve metadata --metadata Flow:The_Flow_Name-1 --target-org prodorg
This downloaded a file formatted in XML to my computer at C:\misc\force-app\main\default\The_Flow_Name-1.flow-meta.xml.
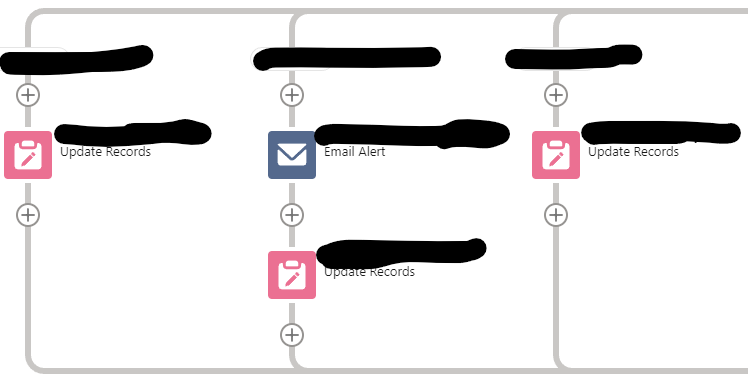
Here’s what the relevant part of a big Decision version 1 looked like in Flow Builder, before I wrapped an Email Alert in a second Decision:
Download flow version 2
In a Terminal prompt of VSCode that was running in a C:\misc> folder context, I ran the following command a copy of version 2 of a flow called “The_Flow_Name:”
sf retrieve metadata --metadata Flow:The_Flow_Name-2 --target-org prodorg
This downloaded a file formatted in XML to my computer at C:\misc\force-app\main\default\The_Flow_Name.flow-meta.xml.
(Note that even though I put “-2” into the command to download it, Salesforce decided to chop that off in the filename it downloaded, because the SFDX CLI thought, “Hey, cool, highest version number on file! I guess can get rid of the version number, regardless of whether the flow is active or not.”)
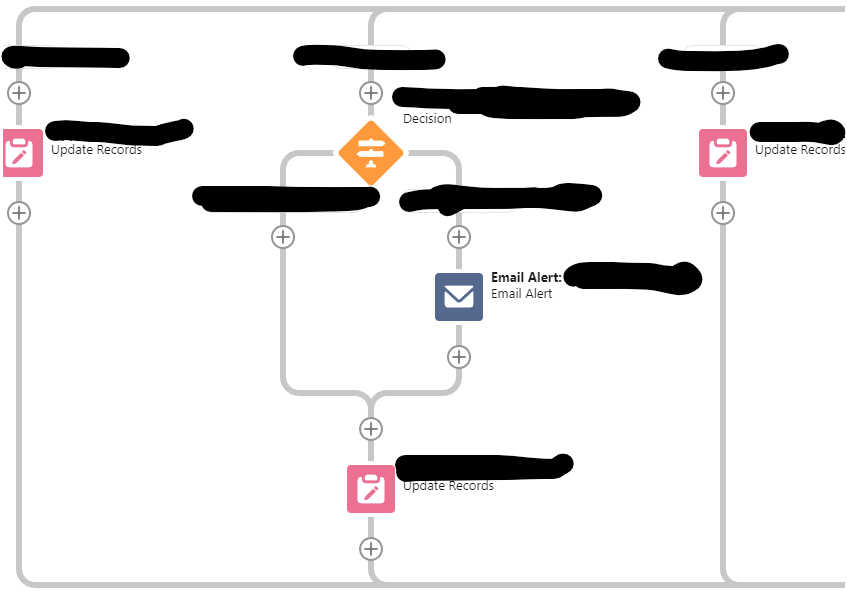
Here’s what the relevant part of a big Decision version 2 looked like in Flow Builder, after I wrapped an Email Alert in a second Decision:
Compare the two files
(Thanks to Mike Tromba for these instructions.)
- Right-clicking on
The_Flow_Name-1.flow-meta.xmlin the file tree at left inside of VSCode, I click “Select for Compare.” - Right-clicking on
The_Flow_Name.flow-meta.xmlin the file tree at left inside of VSCode, I click “Compare with Selected.”
At right, the two versions appeared side-by-side, with version 1 on the left and version 2 on the right.
At the far right of VSCode, a scrollbar colored in red for things that disappeared from version 1 to version 2, and green for things that got added from version 1 to version 2. (Colorblind tip: in the scrollbar, the red is a bit darker than the green with default VSCode settings as of 9/20/22.)
Also, in each side-by-side panel, the line numbers have minuses and pluses to the right of them that are the equivalent of red and green, respectively. (Sorry, I’m not sure whether/how VSCode behaves with a screen reader in this respect.)
I scroll down the file, validating that I don’t find any surprises in the lines of code that VSCode has highlighted for me as having “changed.”
That’s it! That’s all the “hard parts” there were to this whole tutorial!
(Read on if you’re curious exactly what I was looking for when I compared the two files, though.)
What I looked for
In my case, having put a new Decision inside of a branch of an existing Decision, here’s what I found in version 2 using VSCode’s compare feature:
- A lot of numbers changed between
<locationX>...</locationX>and<locationY>...</locationY>tags. Whatever, that’s fine – that just has to do with Flow auto-adjusting the layout a bit to make room for the new Decision.
- Inside of the
<decisions>...</decisions>XML element representing the preexisting decision, “connector.targetReference” sub-element of one of its<rules>...</rules>sub-elements had changed so that instead of being “Send_Branch_B_Email” (the API name of the Email Alert flow element I wanted to wrap in a new Decision flow element), it said “Special_Exception” (the API name of my new Decision flow element).
- An entirely new
<decisions>...<name>Special_Exception</name>...</decisions>XML element was added to the file to represent the brand new Decision flow element I added to version 2.- The new Decision XML element’s “
defaultConnector.targetReference” sub-element was “Send_Branch_B_Email,” the API name of the Email Alert flow element that I wanted to wrap in a Decision. - The new Decision XML element had exactly 1 “
rules” sub-element in it, which is perfect, because I only set up 1 outcome for the brand new decision besides its default.- That rule’s “
connector.targetReference” sub-element was “Do_Branch_B_Update” (the API name of the Update Records flow element that comes after the end of the brand new decision), which was a little surprising to me since I didn’t know that’s how Flow XML is structured, but since it looks good in the visual Flow Builder, I was okay with it.
- That rule’s “
- The new Decision XML element’s “
- Interestingly, the
<actionCalls><name>Send_Branch_B_Email</name>...</actionCalls>XML element representing my Email Alert didn’t change between version 1 and version 2.- It still had a “
connector.targetReference” sub-element of “Do_Branch_B_Update” (the API name of the Update Records flow element that comes after the end of the brand new decision), just like it did before when there was no inner Decision around “Send_Branch_B_Email”.- Again, that kind of surprised me, since in the visual Flow Builder, it looks like it’s somehow after the end of the decision closes out, but apparently, as a technicality, behind the scenes, the decision never “closes up,” per se.
- Rather, each of its branches all just refer to the same API name for a
<recordUpdates>...</recordUpdates>XML element as each other. - If you think creatively while looking at the visual Flow Builder, you can kind of see it – the “coming together” of lines at the end of a 2-branch Decision closing out is made up of, well, 2 lines – each pointing to the same downstream, from two different upstream elements. Technically, the two lines don’t really “close up” with each other at any sort of clickable element, so … I guess this makes sense.
- Okay, I lied – actually, I did discover something different. VSCode compare-and-contrast marked some green-red at
<actionCalls><name>Send_Branch_B_Email</name>...</actionCalls>.- It revealed that in copying and pasting “
Send_Branch_B_Email” to get it inside my new decision (and then deleting the old Email Alert element), since cut was missing as an option in Flow Builder, I’d ended up renaming it “Send_Branch_B_Email_0.” - I went back into Flow Builder, clicked the Email Alert element, clicked Edit Element, clicked the pencil next to “
Send_Branch_B_Email_0,” renamed it “Send_Branch_B_Email,” clicked Done, clicked Save on my Flow. - I re-downloaded the version 2 codebase by running
sf retrieve metadata --metadata Flow:The_Flow_Name-2 --target-org prodorgagain. - My “compare” in VSCode auto-updated when the SFDX CLI downloaded a fresh copy of
The_Flow_Name.flow-meta.xml. The red-green markings disappeared from the<actionCalls><name>Send_Branch_B_Email</name>...</actionCalls>element of my XML comparison. - Then I wrote this blog post as if the cleaner element API name had always been there.
- Thanks, VSCode! (I don’t know why, something about that “
_0” just bugged me.)
- It revealed that in copying and pasting “
- It still had a “
Clean up
I then deleted the entire C:\misc\ folder from my computer.
Further considerations
I’d be in trouble with the Salesforce community if I didn’t point this out:
Once you get comfortable downloading the XML-formatted plaintext that’s behind the scenes for Flow onto your computer, you’re halfway to partnering with other admins and developers at your company to use version control as an important part of your process for propagating Salesforce configuration changes from one org to another.
